[Spring boot] Spring boot 整合RabbitMQ实现通过RabbitMQ进行项目的连接
目录
消息队列:接受并转发消息,类似于快递公司
Binding :绑定交换机和队列
Routing key :路由键,决定路由规则
Connection :连接服务端
Channel :信道,读写数据.
Virtual host :虚拟主机,用于区分不同服务,类似于不同域名,不会相互影响
LINUX环境下安装3.8.2 使用Xshell
Springboot 整合RabbitMQ代码实操
什么是RabbitMQ
官网 Messaging that just works — RabbitMQ

消息队列:接受并转发消息,类似于快递公司
product : 消息的发送者,生产者
consumer:消息的消费者,从队列获取消息,并且使用
queue :先进先出,一个queue可以对应多个consumer
消息队列的优点
代码解耦,提高系统稳定性
应对流量高峰,降低流量冲击,面对秒杀这种情况时,请求进来先去排队,可以保证系统的稳定
异步执行,提高系统响应速度
消息队列的特性
性能好
它是一种基础组件
支持消息确认,为了防止数据丢失以及应对特殊情况,在数据没有处理完,没有确认之前消息不会丢掉。
RabbitMQ特点
路由能力灵活强大
开源免费
支持编程语言多
应用广泛,社区活跃
有开箱即用的监控和管理后台
RabbitMQ核心概念
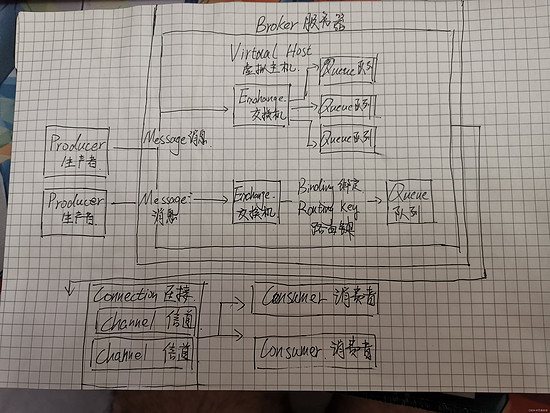
生产者数量是不限制的,生产者生产的消息Message进入交换机,交换一可以连接多个队列也可以仅连接一个对联,交换机与队列的关系是不固定的,交换机会绑定到队列上(Binding)根据的规则就是Routing Key路由键用来确定交换机与队列如何进行绑定 ,消息经过交换机经过连接发送个消费者,在连接中多多个信道,数据都是在信道中进行读写的,消费者从中提取想要的消息进行处理。Broker(服务实例)也就是服务端,Virtual Host (虚拟主机)同一个RabbitMQ可能给多个服务进行使用,服务与服务之间想要隔离开就可以使用虚拟主机进行隔离。
Producer :消息生产者
Message :消息
Exchange :交换机
Binding :绑定交换机和队列
Routing key :路由键,决定路由规则
Queue :队列,存储消息
Connection :连接服务端
Channel :信道,读写数据.
Consumer :消费者
Broker :服务实例
Virtual host :虚拟主机,用于区分不同服务,类似于不同域名,不会相互影响
安装RabbitMQ
LINUX环境下安装3.8.2 使用Xshell
先进行环境配置
连接成功以后输入
echo "export LC_ALL=en_US.UTF-8" >> /etc/profile 把编码设置成utf-8
source /etc/profile 使设置生效
输入curl -s https://packagecloud.io/install/repositories/rabbitmq/rabbitmq-server/script.rpm.sh | sudo bash 配置RabbitMQ源

看到这个命令就可以进行下一步了
curl -s https://packagecloud.io/install/repositories/rabbitmq/erlang/script.rpm.sh | sudo bash
配置erlang环境

看到这个命令进行下一步
sudo yum install rabbitmq-server-3.8.2-1.el7.noarch
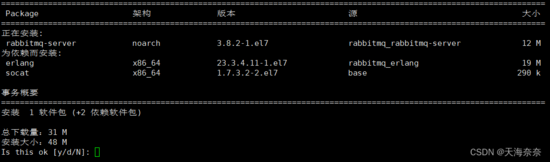
输入y

常用命令
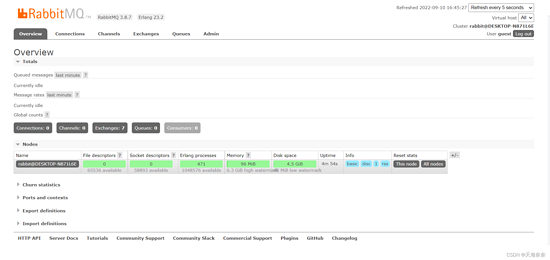
开启web管理界面
rabbitmq-plugins enable rabbitmq_management
停止RabbitMQ
rabbitmqctl stop
设置开机启动
systemctl enable rabbitmq-server
启动RabbitMQ
systemctl start rabbitmq-server
看看端口有没有起来,查看状态
rabbitmqctl status
要检查RabbitMQ服务器的状态,请运行:
systemctl status rabbitmq-server
Windows
先安装erlang并配置环境,安装RabbitMQ
链接:https://pan.baidu.com/s/1S4D2zh-NSoXh-QPQVNBi-w
提取码:1111
这里直接放上链接,erlang安装好后要去配置环境

解压缩后sbin目录下,rabbitmq-server.bat 这个文件就是启动
用终端cmd输入:
cd d:你的RabbitMQ按照地址sbin
rabbitmq-plugins enable rabbitmq_management
rabbitmq-server
然后就可以用guest访问 http://127.0.0.1:15672/#/
账号密码都是guest
RabbitMQ实操分布了解
1 生产者
这里的前提是你有个云服务器,并且已经完成了配置,为了操作简便这里就用本机了哈
我们要有一个管理者啊在sbin目录输入
rabbitmqctl add_user newadmin newpassword
rabbitmqctl set_user_tags newadmin administrator
rabbitmqctl set_permissions -p / newadmin ".*" ".*" ".*"//这一步已经把在虚拟主机上把权限配置了
账号test 密码123456
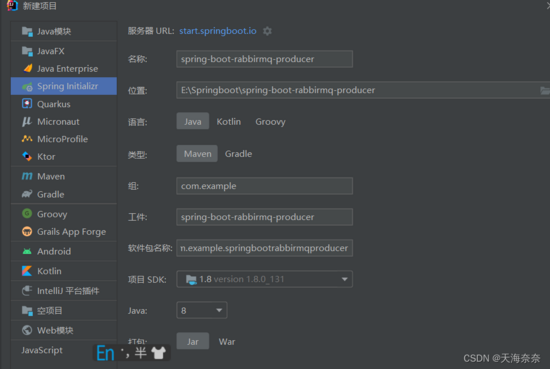
新建一个mavene项目,
2 引入依赖
com.rabbitmq amqp-client 5.8.0 org.slf4j slf4j-nop 1.7.29 /*** 描述 发送类 连接到服务端 发送 退出*/
public class Send {//设置队列的名字private final static String QUEUE_NAME = "hello";public static void main(String[] args) throws IOException, TimeoutException {//创建连接工厂ConnectionFactory factory = new ConnectionFactory();//设置RabbitMQ地址factory.setHost("127.0.0.1");factory.setUsername("test");factory.setPassword("123456");//建立连接Connection connection = factory.newConnection();//获得信道Channel channel = connection.createChannel();//声明队列// queueName 持久存在? 独有? 自动删除?channel.queueDeclare(QUEUE_NAME, false, false, false, null);//发布消息String message = "Hello World! ";channel.basicPublish("", QUEUE_NAME, null, message.getBytes("UTF-8"));System.out.println("发送了消息:" + message);//关闭连接channel.close();connection.close();}
}
运行一下

发送成功了 如果我么连接不到RabbitMQ是无法正常发送的
2 消费者
我么要做的就是把刚刚发送的存储在队列里的消息拿到并打印出来
*** 描述:     接收消息,并打印,持续运行*/
 public class Recvice {private final static String QUEUE_NAME = "hello";public static void main(String[] args) throws IOException, TimeoutException {//创建连接工厂ConnectionFactory factory = new ConnectionFactory();//设置RabbitMQ地址factory.setHost("127.0.0.1");factory.setUsername("test");factory.setPassword("123456");//建立连接Connection connection = factory.newConnection();//获得信道Channel channel = connection.createChannel();//声明队列channel.queueDeclare(QUEUE_NAME, false, false, false, null);//接收消息并消费       queueName    自动签收   处理消息channel.basicConsume(QUEUE_NAME, true, new DefaultConsumer(channel){@Overridepublic void handleDelivery(String consumerTag, Envelope envelope,BasicProperties properties, byte[] body) throws IOException {String message = new String(body, "UTF-8");System.out.println("收到消息:" + message);}});}
 }
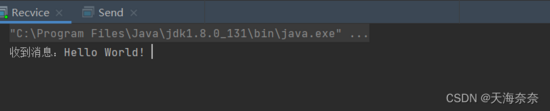
可以看到Receive是(打错了,尬)一直运行的,我么把发送的消息改一下再发送试试
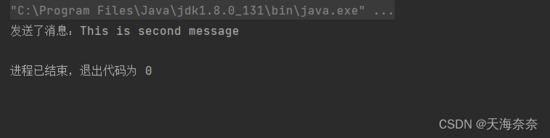
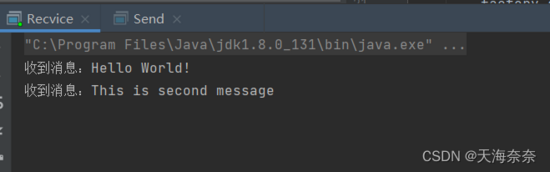
我们之前设置的是自动接收消息们可以看到运行时成功的
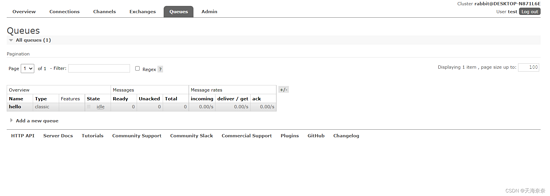
去web控制台也能看到是有hello这个队列的 还有更多的功能就靠你们自己去探索了
Springboot 整合RabbitMQ代码实操
1 新建两个Spring项目 一个生产者,一个消费者不需要引入依赖一会儿手动加

主要关键是定义队列 queue 定义routingKey
生产者
配置文件
guest是默认的用户只能本机时使用
server.port=8080
 spring.application.name=producerspring.rabbitmq.addresses=127.0.0.1:5672
 spring.rabbitmq.username=guest
 spring.rabbitmq.password=guest
 spring.rabbitmq.virtual-host=/
 spring.rabbitmq.connection-timeout=15000
依赖
4.0.0 org.springframework.boot spring-boot-starter-parent 2.2.1.RELEASE com.example spring-boot-rabbirmq-producer 0.0.1-SNAPSHOT spring-boot-rabbirmq-producer spring-boot-rabbirmq-producer 1.8 org.springframework.boot spring-boot-starter org.springframework.boot spring-boot-starter-amqp org.springframework.boot spring-boot-starter-test test org.junit.vintage junit-vintage-engine org.springframework.boot spring-boot-maven-plugin 我们只在原基础上加了一个依赖
spring-boot-starter-amqp启动类
@SpringBootApplication
 public class SpringBootRabbirmqProducerApplication {public static void main(String[] args) {SpringApplication.run(SpringBootRabbirmqProducerApplication.class, args);}}
发送消息类
/*** 描述:     发送消息*/
 @Component
 public class MessageSender {@Autowiredprivate AmqpTemplate rabbitmqTemplate;public void send1() {String message = "This is message 1, routing key is hello.sayHello";System.out.println("发送了:"+message);//                                      交换机         key             内容this.rabbitmqTemplate.convertAndSend("bootExchange", "hello.sayHello", message);}public void send2() {String message = "This is message 2, routing key is hello.sayNothing";System.out.println("发送了:"+message);this.rabbitmqTemplate.convertAndSend("bootExchange", "hello.sayNothing", message);}
 }
配置类
/*** 描述:     rabbitmq配置类*/
 @Configuration
 public class TopicRabbitConfig {//定义队列 注意类型:import org.springframework.amqp.core.Queue;@Beanpublic Queue queue1() {return new Queue("queue1");}@Beanpublic Queue queue2() {return new Queue("queue2");}//交换机@BeanTopicExchange exchange() {return new TopicExchange("bootExchange");}//将队列绑定到交换机@BeanBinding bingdingExchangeMessage1(Queue queue1, TopicExchange exchange) {return BindingBuilder.bind(queue1).to(exchange).with("hello.sayHello");}@BeanBinding bingdingExchangeMessage2(Queue queue2, TopicExchange exchange) {return BindingBuilder.bind(queue2).to(exchange).with("hello.#");}
 }
这里注意第一个消息的routingkey是跟配置类一样的hello.sayHello 就代表 我们这个交换机是仅能识别hello.sayHello的
第二个交换机的routingkey是hello.# 那就意味着只要key是hello.()类型我们都能识别到也就是第一个和第二个消息都能识别到
编写测试类用来发送消息
@SpringBootTest
 class SpringBootRabbirmqProducerApplicationTests {@AutowiredMessageSender messageSender;@Testpublic void send1(){messageSender.send1();}@Testpublic void send2(){messageSender.send2();}}
生产者就编写完成
消费者
配置文件,大体一样,用户我用的管理者权限的用户test 端口号不能一样
server.port=8081
 spring.application.name=consumerspring.rabbitmq.addresses=127.0.0.1:5672
 spring.rabbitmq.username=test
 spring.rabbitmq.password=123456
 spring.rabbitmq.virtual-host=/
 spring.rabbitmq.connection-timeout=15000
依赖 与生产者一样只用加一个
4.0.0 org.springframework.boot spring-boot-starter-parent 2.2.1.RELEASE com.example spring-boot-rabbitmq-consumer 0.0.1-SNAPSHOT spring-boot-rabbitmq-consumer spring-boot-rabbitmq-consumer 1.8 org.springframework.boot spring-boot-starter org.springframework.boot spring-boot-starter-test test org.junit.vintage junit-vintage-engine org.springframework.boot spring-boot-starter-amqp org.springframework.boot spring-boot-maven-plugin 启动类
@SpringBootApplication
 public class SpringBootRabbitmqConsumerApplication {public static void main(String[] args) {SpringApplication.run(SpringBootRabbitmqConsumerApplication.class, args);}}
消费者1 消费者一绑的队列是queue1 接收消息是要通过交换机-> 队列-> 信道 那就意味着队列1中将有hello.sayHello
/*** 描述:     消费者1*/
 @Component
 @RabbitListener(queues = "queue1")
 public class Receiver1 {//处理方法@RabbitHandlerpublic void process(String message) {System.out.println("Receiver1: " + message);}
 }
消费者2
/*** 描述:     消费者2*/
 @Component
 @RabbitListener(queues = "queue2")
 public class Receiver2 {@RabbitHandlerpublic void process(String message) {System.out.println("Receiver2: " + message);}
 }
运行结果

这本身是两个独立的项目,但是通过RabbitMQ使两个项目产生了连接,Springboot完成了对RabbitMQ的整合。
标签:
相关文章
-
无相关信息