Angular学习记录(会把遇到问题记录)
Angular学习之路
安装安装 Angular CLI
cnpm install -g @angular/cli

创建第一个项目使用cli
ng new first-demo-ng
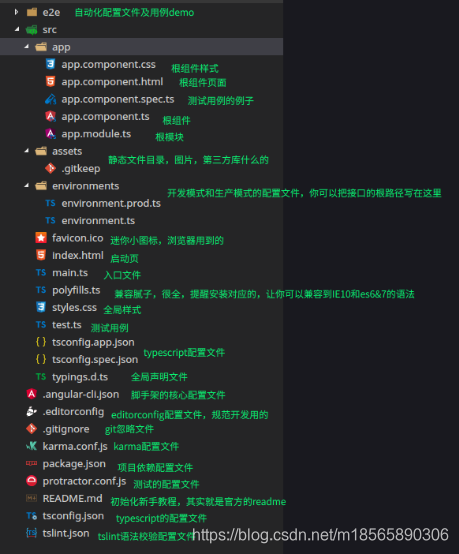
等待大概3分钟安装完毕,编辑器打开看一看到如此目录

使用ng serve --open打开程序

可以看到如下页面

本地打包使用到ng build看到下图说明打包成功了
ng build

常用指令
ng g class classname // 新建 class
ng g component componentname // 新建组件
ng g directive directivename // 新建指令
ng g enum enumname // 新建枚举
ng g module modulename // 新建模块
ng g pipe pipename // 新建管道
ng g service servicename // 新建服务
组件创建ng g component componentname
ng g component componentname
穿件成功会自动生成个目录
然后在app.module.ts中加入
import { ComponentnameComponent } from ‘./componentname/componentname.component’;
并且在declarations中注册

在app.component.html中去使用

效果如下图

组件传值:
父传子
父传值子在父组件定义要传的参数如
public newName = ‘李强’
在组件上
在子组件里面首先引入Input
import { Component, OnInit, Input } from ‘@angular/core’;
在接收父组件传来的自定义名字
@Input() userInfor: string;
页面上使用
我是组件,hello word-----{{userInfor}}
子传父
子组件定义传的参数或者是方法

在组件上面自定义接收名字

或者在父组件引入ViewChild
import { Component, OnInit, ViewChild} from ‘@angular/core’;
在声明调用

实际效果

路由
首先引入安装cnpm install @angular/router -s
cnpm install @angular/router -s
创建首页和新闻页

然后在app目录创建app-routing.module.ts。这个页面是配置项目的路由的
import { NgModule } from ‘@angular/core’;
import {Routes, RouterModule} from ‘@angular/router’;
import {HomeComponent} from ‘./home/home.component’; // 首页
import {NewsComponent} from ‘./news/news.component’; // 新闻
const routes: Routes = [
{path: ‘’, component: HomeComponent}, // 首页
{path: ‘news’, component: NewsComponent} // 新闻
];
@NgModule({
imports: [RouterModule.forRoot(routes)],
exports: [RouterModule],
providers: []
})
export class AppRoutingModule {}

路由配置完毕需要在app.module.ts里面引入

在app.component.html中把路由站位打开

如此路由就配置好了,跳转的方式很多种如a标签
事件点击跳转

在home.component.ts里面引入Router,在constructor声明router,使用的两个方法
this.router.navigate([‘news’]);
this.router.navigateByUrl(‘news’);

路由跳转到此成功了


路由传参
URL上传参如首页传参到新闻页面,这种传参方式url上可见

在跳转的事件上面
this.router.navigate([
news/${this.newsId}]);
在news页面接收引入ActivatedRoute
import {Router, ActivatedRoute} from ‘@angular/router’;
然后在constructor中声明ActivatedRoute;然后ngOnInit方法中获取;
this.routerinfo.snapshot.params[‘id’]

最终获得传来的123

现在从新闻页带个名字参数去首页用queryParams
this.router.navigate([’/’],{queryParams: {name: ‘李强’}});

在首页同样引入ActivatedRoute,在constructor中声明;然后在constructor中获取
activatedRoute.queryParams.subscribe(res => {
this.homeName = res.name;
});

这是首页接收到的名字并重新赋值给homeName。

动态绑定class [ngClass]/[class.class名字. 如下图两种方式isbool为真的时候绑定上名为color-green的class类名。

for循环 跟 if判断(*ngFor/*ngIf) 在页面定义items,循环取值item,下标i。我定义的 private items = [1,2,3];
在上面判断下标大于0的才展示,页面上只会展示2,3

双向数据绑定[(ngModel)]这是双向绑定,[ngModel]单向数据绑定
这是一个巨坑,搞了好久.html页面这样写,在ts文件定义private value = ‘’;如此我以为就成功了。如下图

在跑起项目之后报错如下图

在挣扎,看文档,百度之后原来还要在入口的app.modile .ts还需要单独引入个东西
import { FormsModule } from ‘@angular/forms’; //数据双向绑定需要引入
在NgModule里面的imports中曝光

如此之后就好了,双向绑定成功

标签:
相关文章
-
无相关信息


