使用 AngularJS 开发一个大规模的单页应用(SPA)-接上篇
zz from: http://www.oschina.net/translate/developing-a-large-scale-application-with-a-single?print
使用 AngularJS 开发一个大规模的单页应用(SPA)
下载源代码
(Section 2 Continued)
自定义服务 - AngularJS 服务
AngularJS 服务是可替换的对象,这些对象使用依赖注入连接在一起。 在程序里,你可以使用服务来组织和共享你的代码。 AngularJS 服务是延迟初始化的 – 只有当应用程序组件依赖它时,AngularJS 才会初始化一个服务。
AngularJS 服务是单例类型 – 依赖服务的每个组件都会引用AngularJS 服务工厂类产生的一个实例。 虽然AngularJS 提供一些常用的服务(如$http),但是对于大多数应用来说,你可能想要创建自己的服务。
顾客维护控制器依赖于 CustomerService. 这个顾客服务组件被应用程序用于组织所有访问和向应用程序服务器传递顾客相关数据所需要的Web API路由. 为了保持示例应用程序所有控制器中路由的清晰, 我为每一个部分(包括顾客、订单、产品)都创建了服务层. AngularJS 服务能帮助你组织好你的JavaScript,以获得更好的重用性和可维护性.
顾客服务引用了由控制器设置的回调函数. 这个回调函数会在服务器调用完成时执行. 如你所能看见的,顾客服务没有执行向服务器发起HTTP调用的实际工作。在定义语句中,则会有对将会被动态加载进来的ajaxService的依赖.
01 // customerService.js 02 03 define(['application-configuration', 'ajaxService'], function (app) { 04 05 app.register.service('customersService', ['ajaxService', function (ajaxService) { 06 07 this.importCustomers = function (successFunction, errorFunction) { 08 ajaxService.AjaxGet("/api/customers/ImportCustomers", 09 successFunction, errorFunction); 10 }; 11 12 this.getCustomers = function (customer, successFunction, errorFunction) { 13 ajaxService.AjaxGetWithData(customer, "/api/customers/GetCustomers", 14 successFunction, errorFunction); 15 }; 16 17 this.createCustomer = function (customer, successFunction, errorFunction) { 18 ajaxService.AjaxPost(customer, "/api/customers/CreateCustomer", 19 successFunction, errorFunction); 20 }; 21 22 this.updateCustomer = function (customer, successFunction, errorFunction) { 23 ajaxService.AjaxPost(customer, "/api/customers/UpdateCustomer", 24 successFunction, errorFunction); 25 }; 26 27 this.getCustomer = function (customerID, successFunction, errorFunction) { 28 ajaxService.AjaxGetWithData(customerID, "/api/customers/GetCustomer", 29 successFunction, errorFunction); 30 }; 31 32 }]); 33 34 }); AJAX 服务
为本应用程序所创建的AJAX服务将会被所有的HTTP请求重用。AJAX 服务使用了AngularJS 的 $http 服务 , 该服务会实际执行面向服务器的 HTTP GET 和 POST 调用. 服务器调用的则是 RESTful 服务,返回的是简单的 JSON 对象.
AJAX 服务还使用了blockUI在HTTP请求进行时使用UI来阻塞用户的交互. 此外你还可以应用安全功能来检查用户是否已经被认证. 此应用程序使用了Forms Authentication,它会在每一个请求时附带向服务器发送一个认证的token. 我已经添加了一行代码,通过检查来自服务器的响应消息中一个普通的IsAuthenicated 属性,来看看用户是否仍然是通过认证的.
如果session已经超时,则对IsAuthenicated的检查会将用户路由到登陆页面. 让一个AJAX服务成为管理你所有的AJAX调用的中心,可以使得对整个应用程序的AJAX调用功能的实现和修改变得容易起来.
01 // ajaxService.js 02 03 define(['application-configuration'], function (app) 04 { 05 app.register.service('ajaxService', ['$http', 'blockUI', function ($http, blockUI) { 06 this.AjaxPost = function (data, route, successFunction, errorFunction) { 07 blockUI.start(); 08 setTimeout(function () { 09 $http.post(route, data).success(function 10 (response, status, headers, config) 11 { 12 blockUI.stop(); 13 successFunction(response, status); 14 }).error(function (response) { 15 blockUI.stop(); 16 if (response.IsAuthenicated == false) 17 { 18 window.location = "/index.html"; 19 } 20 errorFunction(response); 21 }); 22 }, 1000); 23 } 24 25 this.AjaxGet = function (route, successFunction, errorFunction) { 26 blockUI.start(); 27 setTimeout(function () { 28 $http({ method: 'GET', url: route }).success( 29 function (response, status, headers, config) { 30 blockUI.stop(); 31 successFunction(response, status); 32 }).error(function (response) { 33 blockUI.stop(); 34 if (response.IsAuthenicated == false) 35 { 36 window.location = "/index.html"; 37 } 38 errorFunction(response); 39 }); 40 }, 1000); 41 } 42 43 this.AjaxGetWithData = function (data, route, successFunction, errorFunction) { 44 blockUI.start(); 45 setTimeout(function () { 46 $http({ method: 'GET', url: route, params: data }).success( 47 function (response, status, headers, config) { 48 blockUI.stop(); 49 successFunction(response, status); 50 }).error(function (response) { 51 blockUI.stop(); 52 if (response.IsAuthenicated == false) 53 { 54 window.location = "/index.html"; 55 } 56 errorFunction(response); 57 }); 58 }, 1000); 59 } 60 61 }]); 62 }); 用于AJAX服务的额外配置
在application-configuration.js文件中,加入了用于AJAX服务器请求的额外配置. 为了配置AngularJS 跟随每次请求传递Forms Authentication的 cookie 信息, $httpProvider 会需要一个用于让 withCredentials 属性被设置为true的值.
在http连接中,AngularJS 不默认返回一个XMLHttpRequest对象,但是你可以在$httpProvider服务里配置。 当浏览器请求中含有一些阻塞UI展示的配置项时,你可以使用blockUI组件,实现在前台展示自定义的消息。
01 // application-configuration.js 02 03 app.config(function ($httpProvider) { 04 $httpProvider.defaults.headers.common['X-Requested-With'] = 'XMLHttpRequest'; 05 $httpProvider.defaults.withCredentials = true; 06 }); 07 app.config(function (blockUIConfigProvider) { 08 // 修改默认的提示信息 09 blockUIConfigProvider.message("executing..."); 10 // 修改UI不可见时默认的延迟时间为100ms 11 blockUIConfigProvider.delay(1); 12 // 禁用自动阻塞页面展示配置项 13 blockUIConfigProvider.autoBlock(false); 14 }); 在每个页面请求中进行身份验证
在示例中,indexController控制前台页面的展示。 基于这一点,加载配置项时,我在application-configuration.js中定义indexController。这样,在应用程序运行之前,indexController和AngularJS一起被加载、注册。 大型的网页应用中,对于每个页面的请求,通常优先进行身份验证、授权。 为了解决这个问题,indexController包含一个函数,实现在每个页面请求前,对用户身份进行验证。
AngularJS 可以配置、监听客户端页面上用户触发的事件。 其中一个事件是$routeChangeStart。 每次请求路由定位时,都会触发这个事件。 为了使监听器工作,你只需使用$scope.$on指令配置下这个事件。
由于indexController 控制页面的跳转,因此可以在indexController 里配置$routeChangeStart 事件。在下面的示例中,为了判断用户是否被授权,浏览器在页面请求前优先执行了一个http get请求。 如果返回的isAuthenicated值为false,浏览器会跳转到登陆页面。 另外,你可以进行额外的安全性检查来判断用户是否有权限访问请求的页面。
01 // indexController.js 02 03 var indexController = function ($scope, $rootScope, $http, $location, blockUI) { 04 05 $scope.$on('$routeChangeStart', function (scope, next, current) { 06 $scope.authenicateUser($location.path(), 07 $scope.authenicateUserComplete, $scope.authenicateUserError); 08 }); 09 10 $scope.authenicateUser = function (route, successFunction, errorFunction) { 11 var authenication = new Object(); 12 authenication.route = route; 13 $scope.AjaxGet(authenication, "/api/main/AuthenicateUser", 14 successFunction, errorFunction); 15 }; 16 17 $scope.authenicateUserComplete = function (response) { 18 if (response.IsAuthenicated==false) 19 { 20 window.location = "/index.html"; 21 } 22 } 23 24 }; AngularJS $rootScope
在AngularJS里面,每个应用程序都有一个单独的root scope. 所有其他scope都是root scope的衍生物. Scope隔离了模型和视图. 你可以将属性设置在$rootScope之下,这些属性在外壳页面(shell page)的生存周期内一直保留其属性值. 只要用户刷新了浏览器,$rootScope的值就会消失,必须要重新设置.
当示例应用程序初始化加载的时候,它使用$rootScope保存从服务器返回的菜单选项.在用户登录后,拓展后的菜单选项列表将会从服务器返回,它允许用户访问应用程序的其它部分.$rootScope是一个很好的用来保存菜单选项等会话级别信息的地方.
1 $rootScope.MenuItems = response.MenuItems; 在外壳页面(shell page), 菜单项是数据绑定到无序列表的,在每个页面请求时保持设定的状态.
1 class="navbar-collapse collapse" id="MainMenu">2 class="nav navbar-nav" ng-repeat="menuItem in MenuItems">3 "{{menuItem.Route}}">{{menuItem.Description}} 4 5 AngularUI
下面的示例中使用了AngularUI的各种UI组件。AngularUI 是AngularJS 框架的一个辅助套件。示例中使用的主要组件大部分来在AngularUI 的一个子集UI Bootstrap。UI Bootstrap是从Twitter Bootstrap派生出来的,它使用AngularJS编码实现。 UI Bootstrap库包含了一套使用Bootstrap标识和样式的AngularJS 指令。 这使得它不依赖jQuery.js和Bootstrap.js。
Alert (ui.bootstrap.alert)
AngularJS Alert 是由Bootstrap alert 派生过来的。 使用ng-repeat指令,可以实现使用动态模型里的数据弹窗提示。
1 <div style="padding-top:20px"> 2 <alert ng-repeat="alert in alerts" type="{{alert.type}}" close="closeAlert($index)"> 3 <div ng-bind-html="MessageBox">div> 4 alert>5 div>Alert指令支持展示红色的错误信息,绿色的提示信息和黄色的警告信息。 在示例的修改用户信息页面,当用户没有输入必填字段用户名时,页面会弹出一个错误提示。 我扩展了alert的功能:当发生错误时,alert可以高亮显示待输入的文本框。
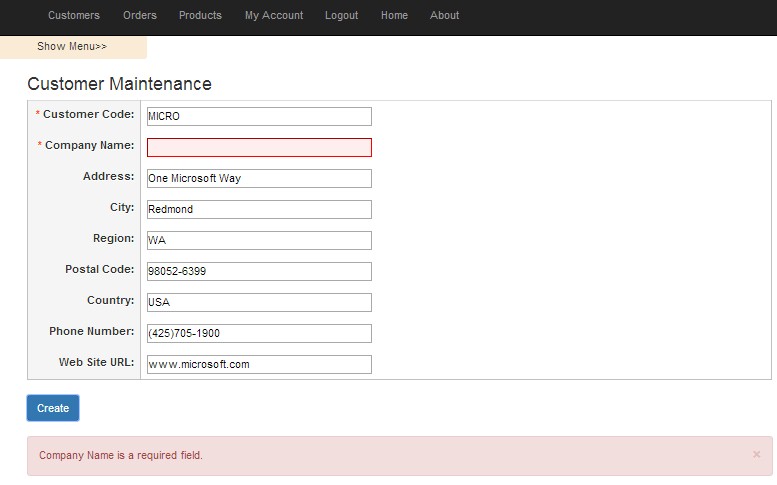
为了更深入的拓展警告指令, 这个示例应用程序包含了一个自定义的指令服务(custom alerts service).它可以在整个应用程序中使用,以渲染警告信息.信息的内容设置在$rootScope里面,它来自于服务器的业务层的验证过程,并在AJAX请求完成后渲染到客户端.
01 // alertsService.js 02 03 define(['application-configuration'], function (app) 04 { 05 app.register.service('alertsService', ['$rootScope', function ($rootScope) { 06 07 $rootScope.alerts = []; 08 $rootScope.MessageBox = ""; 09 10 this.SetValidationErrors = function (scope, validationErrors) { 11 for (var prop in validationErrors) { 12 var property = prop + "InputError"; 13 scope[property] = true; 14 } 15 } 16 17 this.RenderErrorMessage = function (message) { 18 var messageBox = formatMessage(message); 19 $rootScope.alerts = []; 20 $rootScope.MessageBox = messageBox; 21 $rootScope.alerts.push({ 'type': 'danger', 'msg': '' }); 22 }; 23 24 this.RenderSuccessMessage = function (message) { 25 var messageBox = formatMessage(message); 26 $rootScope.alerts = []; 27 $rootScope.MessageBox = messageBox; 28 $rootScope.alerts.push({ 'type': 'success', 'msg': '' }); 29 }; 30 31 this.RenderWarningMessage = function (message) { 32 var messageBox = formatMessage(message); 33 $rootScope.alerts = []; 34 $rootScope.MessageBox = messageBox; 35 $rootScope.alerts.push({ 'type': 'warning', 'msg': '' }); 36 }; 37 38 this.RenderInformationalMessage = function (message) { 39 var messageBox = formatMessage(message); 40 $rootScope.alerts = []; 41 $rootScope.MessageBox = messageBox; 42 $rootScope.alerts.push({ 'type': 'info', 'msg': '' }); 43 }; 44 45 this.closeAlert = function (index) { 46 $rootScope.alerts.splice(index, 1); 47 }; 48 49 function formatMessage(message) { 50 var messageBox = ""; 51 if (angular.isArray(message) == true) { 52 for (var i = 0; i < message.length; i++) { 53 messageBox = messageBox + message[i]; 54 } 55 } 56 else { 57 messageBox = message; 58 } 59 return messageBox; 60 } 61 }]); 62 }); 当创建一个客户记录出错时,下面的代码被执行,同时验证警告服务的调用过程.
1 $scope.createCustomerError = function (response) { 2 alertsService.RenderErrorMessage(response.ReturnMessage); 3 $scope.clearValidationErrors(); 4 alertsService.SetValidationErrors($scope, response.ValidationErrors); 5 } Datepicker控件 (ui.bootstrap.datepicker)
UI Bootstrap Datepicker控件 是一种清洁、灵活和完全可定制的日期选择器。用户可以浏览数月乃至数年。

把Datepicker输入框(input box)标签里,只需把Datepicker相关的参数添加到输入框,然后添加一个按钮,用户可以通过单击日历图标显示Datepicker。
01 02 class="input-label" align="right">class="required">Required Ship Date:03 class="input-box" style="height:50px">04 "RequiredDate" ng-show="DisplayMode">05 "EditMode">06 class="row">07 class="col-md-6">08 class="input-group">09 10 class="{'validation-error': RequiredDateInputError}" type="text" style="width:100px"11 datepicker-popup="MM/dd/yyyy" 12 ng-model="RequiredDate" 13 is-open="opened" 14 datepicker-options="dateOptions" 15 date-disabled="disabled(date, mode)" 16 ng-required="true" 17 close-text="Close" /> 18 19 "button" ng-click="open($event)">"height:10px"20 class="glyphicon glyphicon-calendar"> 21 22 23 24 25 26 27 Modal (ui.bootstrap.modal
UI Bootstrap的Modal是一种服务,它可以快速的创建拥有Angular属性的模态对话框.创建定制化的modal是很简单,只需创建部分视图,增加一个控制器,然后在使用服务的时候引用它们.
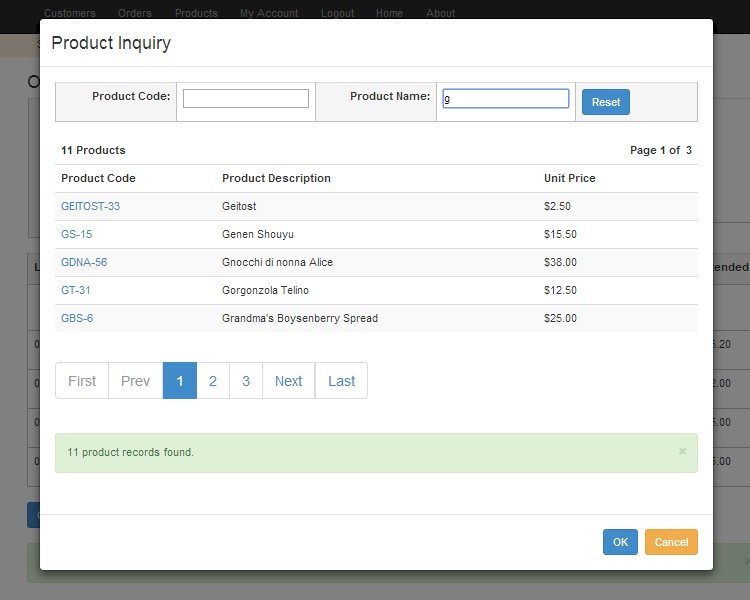
下面的JavaScript代码为Product Inquiry Modal打开了一个HTML模板,并创建了一个modal实例.当一个产品项目被选中的时候,产品id通过modal实例的结果方法返回.这个modal实例从服务器获取产品信息.产品信息返回到调用页面后,modal消失.
01 $scope.openModal = function () { 02 03 var modalInstance = $modal.open({ 04 templateUrl: 'productLookupModal.html', 05 controller: ModalInstanceCtrl, 06 windowClass: 'app-modal-window' 07 }); 08 09 modalInstance.result.then(function (productID) { 10 11 var getProduct = new Object(); 12 getProduct.ProductID = productID; 13 productService.getProduct(getProduct, 14 $scope.getProductCompleted, 15 $scope.getProductError); 16 17 }, function () { 18 // function executed on modal dismissal 19 }); 20 }; 21 22 var ModalInstanceCtrl = function ($scope, $modalInstance) { 23 24 $scope.ProductCode = ""; 25 $scope.ProductDescription = ""; 26 27 $scope.productSelected = function (productID) { 28 $modalInstance.close(productID); 29 }; 30 31 $scope.cancel = function () { 32 $modalInstance.dismiss('cancel'); 33 }; 34 }; Typeahead (ui.bootstrap.typeahead)
Typeahead是AngularJS Bootstrap v2版本的typeahead插件.这个指令可以快速创建一个漂亮的基于任意文本框的typeahead控件.Product Inquiry Modal窗口使用了Typeahead指令
1 "text" ng-model="Description"2 typeahead="product for products in getProducts($viewValue)"> 在上面例子中的typeahead指令,将把输入框中的输入信息作为参数并执行getProducts函数.然后getProducts函数会调用Products Service来执行一个AJAX请求.这个请求将返回一个基于用户输入信息的产品数据的页面,并设置产品查询数据列表.
1 $scope.getProducts = function () { 2 var productInquiry = $scope.createProductInquiryObject(); 3 productService.getProducts(productInquiry, 4 $scope.productInquiryCompleted, $scope.productInquiryError); 5 } Pagination (ui.bootstrap.pagination)
Pagination是一个轻量级的分页指令,它集中于提供数据列表分页,显示分页栏以及正确启用和禁用按钮.
1 "true" total-items="TotalProducts" 2 items-per-page="PageSize" ng-change="pageChanged()" 3 ng-model="CurrentPageNumber" class="pagination-lg" 4 previous-text="Prev" next-text="Next" first-text="First" 5 last-text="Last"> 这个应用程序的所有的数据列表都使用了UI Bootstrap分页控件.实际上,有了HTML模板和数据绑定功能,实现多用途的数据列表是很容易的.这个数据列表包含类似于这个应用程序的分页和排序功能.
下面的产品查询数据列表的HTML模板,详细描述了如何使用视图来排序以及划分分页.在控制器的视图模型中的数据是和表格绑定,其中表格的行是通过AngularJS的ng-repeat指令动态渲染的.这个指令也用于为每个列头创建动态的列头标签.用户可以通过点击列头来排序.HTML模板和数据绑定功能提供了强大的和简洁的动态生成功能.使用一段时间的HTML模板后,你将不愿再回到使用ASP.NET Server Control的一团糟的状况了.
01 02 03 class="table table-striped table-hover" style="width: 100%;">04 05 06 "2" style="width: 50%">07 "TotalProducts"> Products08 09 "5" style="text-align: right; width: 50%">10 Page "CurrentPageNumber"> of 11 "TotalPages">12 13 14 15 "tableHeader in tableHeaders" ng:class="setSortIndicator(tableHeader.label)" 16 ng:click="changeSorting(tableHeader.label)">{{tableHeader.label}} 17 18 19 20 "product in products">21 22 "width: 25%; height: 25px">"ok(product.ProductID)" 23 style=" cursor pointer; 24 text-decoration underline; 25 color black">{{product.ProductCode}} 26 27 "width: 50%; white-space: nowrap">"product.Description">28 "width: 25%; text-align:left; white-space: nowrap">29 {{product.UnitPrice | currency}} 30 31 32 33 34 35 "true" total-items="TotalProducts" items-per-page="PageSize" 36 ng-change="pageChanged()" ng-model="CurrentPageNumber" class="pagination-lg" 37 previous-text="Prev" next-text="Next" first-text="First" last-text="Last"> 38 最后,包装一下产品查询列表,下面的产品查询模态控制器包含了一个自定义数据列表服务引用.它用来在示例应用程序中,为所有的数据列表实现排序功能.这是又一个使用AngularJS Services和Factories的例子.它把代码封装成小的可重复使用的,简洁的,易读的和易于维护的模块.
001 // productLookupModalController.js 002 003 "use strict"; 004 define(['application-configuration', 'productsService', 'alertsService', 'dataGridService'], 005 function (app) { 006 app.register.controller('productLookupModalController', ['$scope', '$rootScope', 007 'productsService', 'alertsService', 'dataGridService', 008 009 function ($scope, $rootScope, productService, alertsService, dataGridService) { 010 011 $scope.initializeController = function () { 012 013 $rootScope.alerts = []; 014 015 dataGridService.initializeTableHeaders(); 016 dataGridService.addHeader("Product Code", "ProductCode"); 017 dataGridService.addHeader("Product Description", "Description"); 018 dataGridService.addHeader("Unit Price", "UnitPrice"); 019 020 $scope.tableHeaders = dataGridService.setTableHeaders(); 021 $scope.defaultSort = dataGridService.setDefaultSort("Description"); 022 023 $scope.changeSorting = function (column) { 024 dataGridService.changeSorting(column, 025 $scope.defaultSort, $scope.tableHeaders); 026 027 $scope.defaultSort = dataGridService.getSort(); 028 $scope.SortDirection = dataGridService.getSortDirection(); 029 $scope.SortExpression = dataGridService.getSortExpression(); 030 $scope.CurrentPageNumber = 1; 031 $scope.getProducts(); 032 }; 033 034 $scope.setSortIndicator = function (column) { 035 return dataGridService.setSortIndicator(column, $scope.defaultSort); 036 }; 037 038 $scope.ProductCode = ""; 039 $scope.Description = ""; 040 $scope.PageSize = 5; 041 $scope.SortDirection = "ASC"; 042 $scope.SortExpression = "Description"; 043 $scope.CurrentPageNumber = 1; 044 $rootScope.closeAlert = dataGridService.closeAlert; 045 $scope.products = []; 046 $scope.getProducts(); 047 } 048 049 $scope.productInquiryCompleted = function (response, status) { 050 alertsService.RenderSuccessMessage(response.ReturnMessage); 051 $scope.products = response.Products; 052 $scope.TotalProducts = response.TotalRows; 053 $scope.TotalPages = response.TotalPages; 054 } 055 056 $scope.searchProducts = function () { 057 $scope.CurrentPageNumber = 1; 058 $scope.getProducts(); 059 } 060 061 $scope.pageChanged = function () { 062 $scope.getProducts(); 063 } 064 065 $scope.getProducts = function () { 066 var productInquiry = $scope.createProductInquiryObject(); 067 productService.getProducts(productInquiry, 068 $scope.productInquiryCompleted, $scope.productInquiryError); 069 } 070 071 $scope.getProductsTypeAheadProductCode = function (productCode) { 072 $scope.ProductCode = productCode; 073 var productInquiry = $scope.createProductInquiryObject(); 074 productService.getProductsWithNoBlock(productInquiry, 075 $scope.productInquiryCompleted, $scope.productInquiryError); 076 } 077 078 $scope.getProductsTypeAheadDescription = function (description) { 079 $scope.Description = description; 080 var productInquiry = $scope.createProductInquiryObject(); 081 productService.getProductsWithNoBlock(productInquiry, 082 $scope.productInquiryCompleted, $scope.productInquiryError); 083 } 084 085 $scope.productInquiryError = function (response, status) { 086 alertsService.RenderErrorMessage(response.Error); 087 } 088 089 $scope.resetSearchFields = function () { 090 $scope.ProductCode = ""; 091 $scope.Description = ""; 092 $scope.getProducts(); 093 } 094 095 $scope.createProductInquiryObject = function () { 096 097 var productInquiry = new Object(); 098 099 productInquiry.ProductCode = $scope.ProductCode; 100 productInquiry.Description = $scope.Description; 101 productInquiry.CurrentPageNumber = $scope.CurrentPageNumber; 102 productInquiry.SortExpression = $scope.SortExpression; 103 productInquiry.SortDirection = $scope.SortDirection; 104 productInquiry.PageSize = $scope.PageSize; 105 106 return productInquiry; 107 108 } 109 $scope.setHeaderAlignment = function (label) { 110 if (label == "Unit Price") 111 return { 'textAlign': 'right' } 112 else 113 return { 'textAlign': 'left' } 114 } 115 }]); 116 }); 结论
我敢说jQuery过时了吗?当然,jQuery仍然很流行并广泛使用.但是,过去的一些年见证了结构化设计模式的框架和库,如MVC和MVVM(Model-View-ViewModel)的崛起.这些框架和库包括Backbone.js, Ember.js和AngularJS等.
AngularJS是一个MVC/MVVM framework.它由google创建,以开发具有良好体系结构的和可维护的web应用程序.AngularJS定义了大量的概念来合理的组织web应用程序.应用程序由相互依赖的模块来定义.它通过新的属性或者标签和表达式,关联指令到页面来增强HTML,以定义功能强大的模板.它也将应用程序的行为封装到控制器,这些控制器通过依赖注入的方式实例化.这有利于结构化,而且非常容易测试JavaScript代码.是的,这里有你开发大型应用程序前端代码所需的所有东西.AngularJS可能是自jQuery之后,下一个JavaScript大事件.
JavaScript世界开始变得很有意思.我还没有提到MEAN Stack(AngularJS,Express,NodeJS,MongoDB)的繁荣.它实现了JavaScript从前端到后端的整个平台.很值得期待,所有这些在将来会去向何处.
创建示例应用程序所用到的技术
AngularJS
RequireJS
Visual Studio Express 2013 for Web
Microsoft .NET 4.5.1
Microsoft .NET C#
Microsoft Web API 2
Microsoft Entity Framework 6.0
SQL Server Express
本文地址:http://www.oschina.net/translate/developing-a-large-scale-application-with-a-single
原文地址:http://www.codeproject.com/Articles/808213/Developing-a-Large-Scale-Application-with-a-Single
本文中的所有译文仅用于学习和交流目的,转载请务必注明文章译者、出处、和本文链接我们的翻译工作遵照 CC 协议,如果我们的工作有侵犯到您的权益,请及时联系我们
标签:
相关文章
-
无相关信息