实例QT程序 —— QTableWidget 表格添加/删除单元格控件
程序开发
2023-09-04 20:51:32
目录
1.简介
2.效果图
3.重点讲解
4.源码
源码下载地址
https://download.csdn.net/download/Redboy_Crazy/12289546
1.简介
本文主要介绍了如何在QTableWidget表格的单元格中添加和删除控件,内容包含动态效果图、重点讲解和源码,读者们可以方便查看学习和交流。
回目录
2.效果图

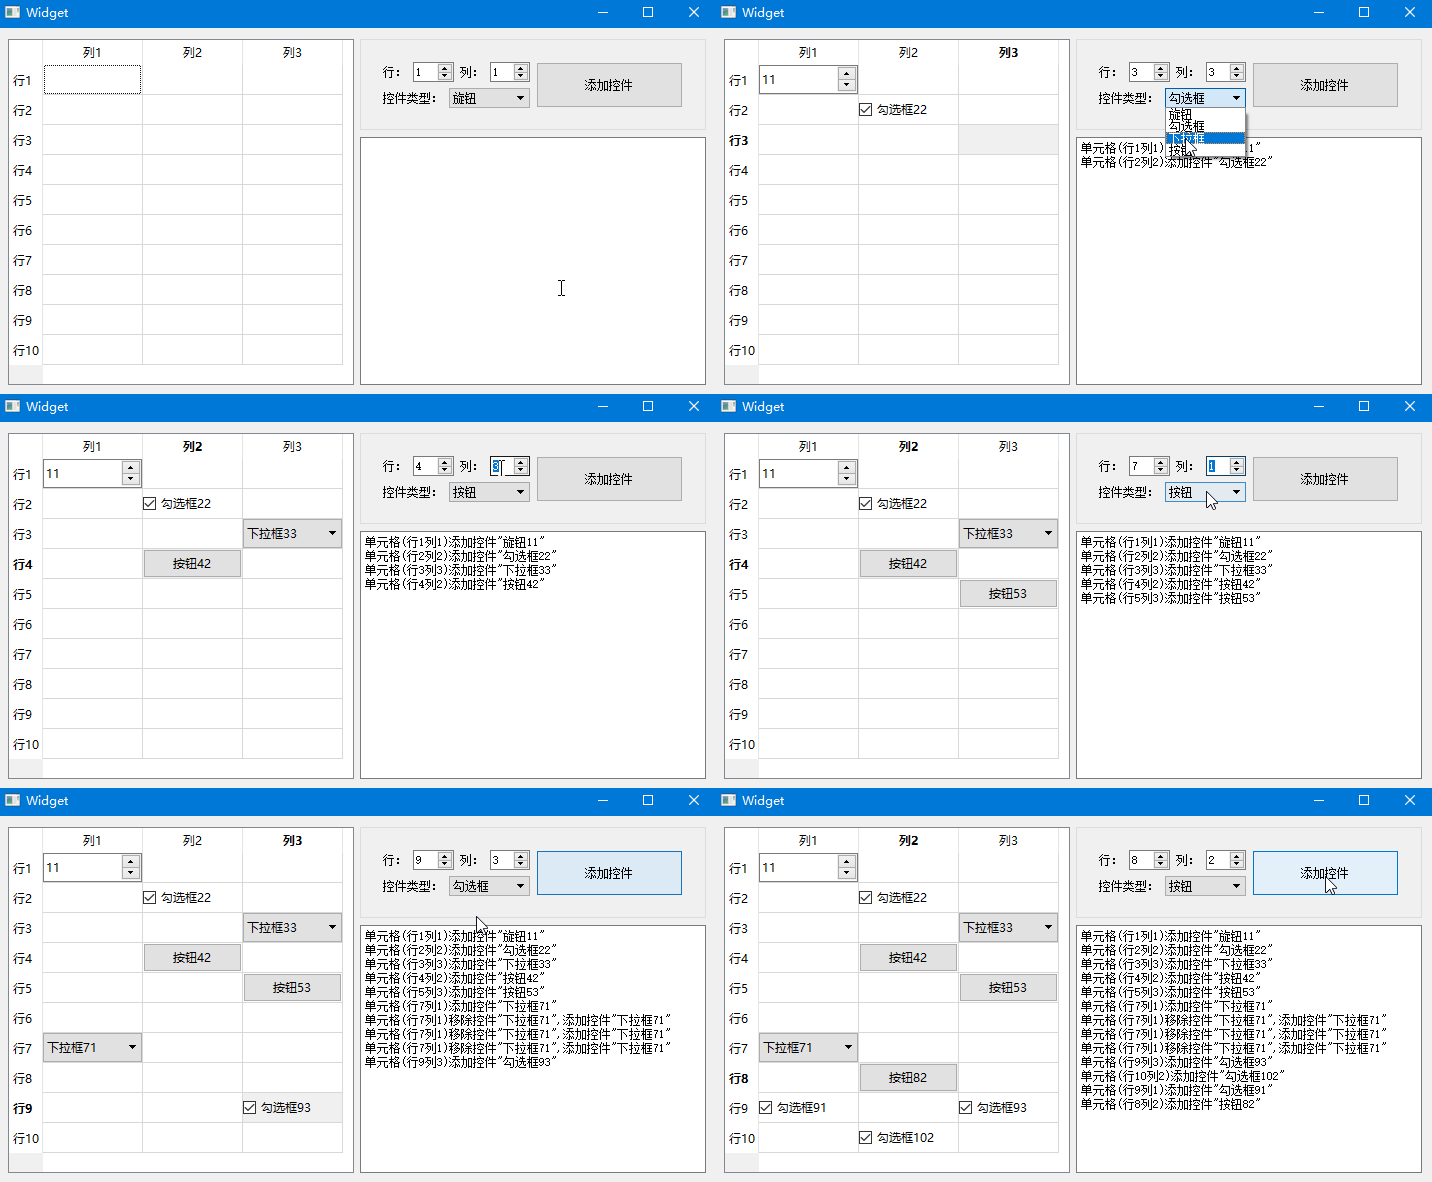
运行效果图
回目录
3.重点讲解
1) 通过以下语句,我们可以在指定单元格中设置我们期望的控件(如示例中的勾选框、下拉框、按钮、旋钮框等); ui->tableWidget->setCellWidget(row, col, wdgAdd);
2)单元格中删除控件的语句如下:
ui->tableWidget->removeCellWidget(row, col);
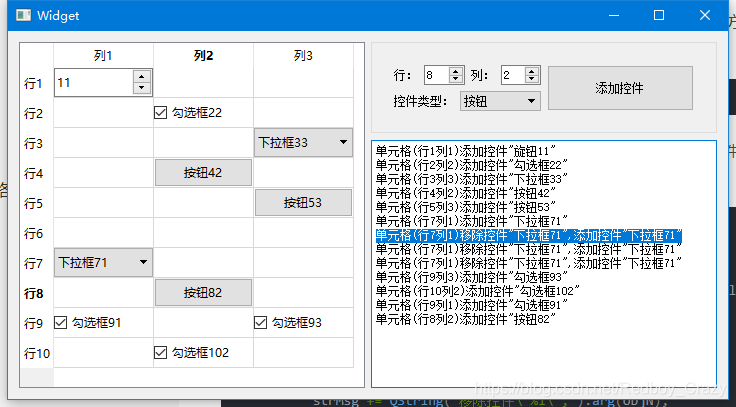
从下面的代码片段及实际运行打印信息发现,以上remove仅仅是把控件从单元格中移除,但是并未delete释放掉,需要主动释放避免内存泄漏,大家使用中请注意该问题;
QWidget *wdgPre = ui->tableWidget->cellWidget(row, col); //之前的控件QString strMsg = tabPosInfo;if( nullptr != wdgPre ){qDebug() << "removeCellWidget at(" << row << "," << col << ")";ui->tableWidget->removeCellWidget(row, col);QString objN = wdgPre->objectName();delete wdgPre;wdgPre = nullptr;strMsg += QString("移除控件"%1",").arg(objN);}ui->tableWidget->setCellWidget(row, col, wdgAdd);strMsg += QString("添加控件"%1"").arg(txt);ui->plainTextEdit->appendPlainText(strMsg);
打印信息截图:

回目录
4.源码
widget.h
#ifndef WIDGET_H
 #define WIDGET_H#include namespace Ui {
 class Widget;
 }class Widget : public QWidget
 {Q_OBJECTpublic:explicit Widget(QWidget *parent = nullptr);~Widget();enum CellWidgetType {CWT_CheckBox,   // 勾选框CWT_SpinBox,   // 旋钮CWT_PushButton,   // 按钮CWT_ComboBox,   // 下拉框};private slots:void on_btnAddCellWdg_clicked();void on_tableWidget_cellClicked(int row, int column);private:void initData();    // 初始化数据void initForm();    // 初始化窗体private:Ui::Widget *ui;QHash m_hashIdxType;  // <索引, 控件名称>
 };#endif // WIDGET_H
widget.cpp
#include "widget.h"
 #include "ui_widget.h"
 #include
 #include
 #include
 #include
 #include Widget::Widget(QWidget *parent) :QWidget(parent),ui(new Ui::Widget)
 {ui->setupUi(this);initData();initForm();
 }Widget::~Widget()
 {delete ui;
 }void Widget::initData()
 {m_hashIdxType.insert(CWT_CheckBox, "勾选框");m_hashIdxType.insert(CWT_SpinBox, "旋钮");m_hashIdxType.insert(CWT_PushButton, "按钮");m_hashIdxType.insert(CWT_ComboBox, "下拉框");
 }void Widget::initForm()
 {{int count = 3;QString strPre("列");QStringList headerLabs;for(int i=0; itableWidget->setColumnCount(count);ui->tableWidget->setHorizontalHeaderLabels(headerLabs);ui->spinBoxCol->setRange(1, count);}{int count = 10;QString strPre("行");QStringList headerLabs;for(int i=0; itableWidget->setRowCount(count);ui->tableWidget->setVerticalHeaderLabels(headerLabs);ui->spinBoxRow->setRange(1, count);}QStringList listType = m_hashIdxType.values();ui->comboBox->addItems(listType);
 }void Widget::on_btnAddCellWdg_clicked()
 {int row = ui->spinBoxRow->value();int col = ui->spinBoxCol->value();QString tabPosInfo = QString("单元格(行%1列%2)").arg(row).arg(col);QString tabPos = QString("%1%2").arg(row).arg(col);QString strTypeName = ui->comboBox->currentText();int curIdx = m_hashIdxType.key(strTypeName);QString txt = strTypeName + tabPos;QWidget *wdgAdd = nullptr;switch (curIdx) {case CWT_CheckBox:{QCheckBox *chkBox = new QCheckBox(txt);chkBox->setChecked(true);wdgAdd = chkBox;break;}case CWT_SpinBox:{QSpinBox *spinBox = new QSpinBox;QString strVal = QString("%1%2").arg(row).arg(col);spinBox->setValue(strVal.toInt());wdgAdd = spinBox;break;}case CWT_PushButton:{wdgAdd = new QPushButton(txt);break;}case CWT_ComboBox:{QComboBox *cBox = new QComboBox;cBox->addItem(txt);wdgAdd = cBox;break;}default:break;}if( nullptr != wdgAdd ){row--;  // 转换为tab中真实的行col--;  // 转换为tab中真实的列wdgAdd->setObjectName(txt);QWidget *wdgPre = ui->tableWidget->cellWidget(row, col);    //之前的控件QString strMsg = tabPosInfo;if( nullptr != wdgPre ){qDebug() << "removeCellWidget at(" << row << "," << col << ")";ui->tableWidget->removeCellWidget(row, col);QString objN = wdgPre->objectName();delete wdgPre;wdgPre = nullptr;strMsg += QString("移除控件"%1",").arg(objN);}ui->tableWidget->setCellWidget(row, col, wdgAdd);strMsg += QString("添加控件"%1"").arg(txt);ui->plainTextEdit->appendPlainText(strMsg);}
 }void Widget::on_tableWidget_cellClicked(int row, int column)
 {ui->spinBoxCol->setValue(column+1);ui->spinBoxRow->setValue(row+1);
 }
回目录
加油,向未来!GO~
Come on!
标签:
上一篇:
vue之组件传值,父子组件双向绑定。
下一篇:
相关文章
-
无相关信息
