Spring Boot 及整合
1.什么是Springboot?
springboot可以帮你简化spring的搭建,并且快速创建一个spring的应用程序。该框架使用了特定的方式来进行配置,从而使开发人员不再需要定义样板化的配置
2.Springboot特点有哪些?
(1)可以创建独立的Spring应用程序,并且基于其Maven或Gradle插件,可以创建可执行的JARs和WARs;
(2)内嵌Tomcat或Jetty等Servlet容器;
(3)提供自动配置的“starter”项目对象模型(POMS)以简化Maven配置;
(4)尽可能自动配置Spring容器;
(5)提供准备好的特性,如指标、健康检查和外部化配置;
(6)绝对没有代码生成,不需要XML配置。
3. 创建springboot工程
条件
1.JDK必须为1.8以上
2.spring的jar必须5.0以上
3.maven必须3.3以上
3.1 介绍springboot中pom文件
4.0.0 org.springframework.boot spring-boot-starter-parent 2.3.12.RELEASE com.ykq qy151-springboot 0.0.1-SNAPSHOT qy151-springboot Demo project for Spring Boot 1.8 org.springframework.boot spring-boot-starter-web org.projectlombok lombok true org.springframework.boot spring-boot-starter-test test org.springframework.boot spring-boot-maven-plugin org.projectlombok lombok 注意:
默认springboot扫描的包为主启动类所在的包以及子包。

3.2 聊一下springboot的配置文件
有两种格式的配置文件:
第一种: properties属性文件
# 修改springboot中tomcat端口号.
server.port=8888
第二种: yml文件
server:
port: 6666
不管是哪种,他们的名字必须以application开始。
如果两个配置文件同时存在,而且有些内容一样。按照properties的优先级高。如果有些不一样,两个配置文件不一样的会合并在一起。
4. 读取springboot配置文件中的内容
OSS文件上传
密钥和bucket名称等---密钥和bucket都写死在java代码中。如果后期修改密钥和bucket的值,你必须修改源码代码。 我们要写在配置文件。然后通过代码在读取配置文件中的密钥和bucket.
如何读取springboot配置文件的内容呢?
通过@PropertiesConfiguration或者@Value注解。
@PropertiesConfiguration该注解使用在类上。
#自定义的配置信息
 student.name=WMD
 student.age=18
 student.hobby[0]=sing
 student.hobby[1]=swing`
@Data
@Component //该类对象的创建和销毁都有spring容器来管理
@ConfigurationProperties(prefix = "student") //读取springboot中的配置内容
public class Student {private String name;private Integer age;private String[] hobby;
}@Autowired //spring容器帮你注入该对象private Student student;@GetMapping("/index")public Student index(){return student;}@Value 只能放在我们的类属性上。而且它只能读取基本类型和字符串类型。
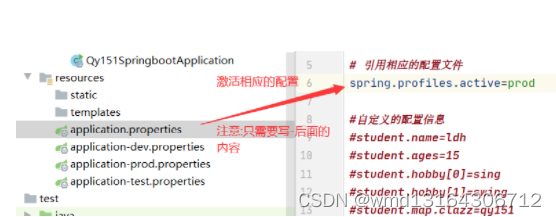
5. profiles文件的介绍
思考: 我们在实际开发中,环境有哪些?
开发环境---->测试环境---->线上环境 由于环境的不同,那么就会有不同的配置内容。
难道我们不断的修改配置内容。----不会
实际工作中,针对不同的环境配置不同的配置文件,然后再总的配置文件中激活相应的配置文件。

6. Springboot注册web三大组件。
什么是web的三个组件?
Servlet和Filter以及Linstener监听器。
为什么要注册这三个组件呢?
因为后面springboot有可能要集成第三方框架,而第三方框架的底层可能就依赖于过滤器或者servlet.
如何注册呢?
思考: 早期:
<1>Servlet类
<2>注册到Tomcat容器web.xml
Servlet类
现在:都没有web.xml
创建一个配置类:
@Configuration //该类为配置类 xml文件
 public class MyConfig {@Bean  //理解为配置文件中public ServletRegistrationBean registrationBean(){//创建一个Servlet注册器.ServletRegistrationBean registrationBean=new ServletRegistrationBean<>();registrationBean.setName("my");registrationBean.setServlet(new MyServlet());registrationBean.addUrlMappings("/my");return registrationBean;}}
以前如何注册过滤器: web.xml
现在:
@Beanpublic FilterRegistrationBean filterRegistrationBean(){FilterRegistrationBean filterRegistrationBean=new FilterRegistrationBean<>();filterRegistrationBean.setName("myfilter");filterRegistrationBean.setFilter(new MyFilter());filterRegistrationBean.addUrlPatterns("/*");return filterRegistrationBean;} 7.springboot自动装配原理
7.1 springboot包扫描的原理
为什么包扫描时,扫描的为主类所在的包以及子包。
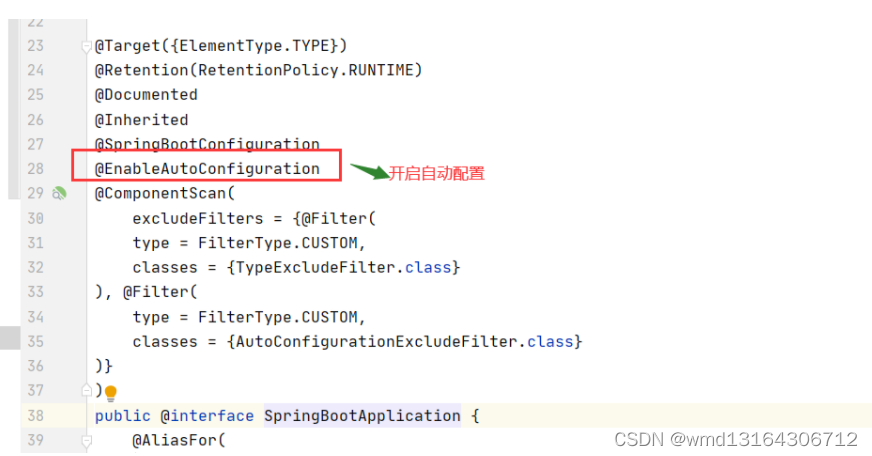
8.springboot自动装配原理。
什么是自动装配?
无需手动加载某些配置,而由Springboot自动加载进来。
譬如: 自己加载DispatcherServlet.
如何完成自动装配?

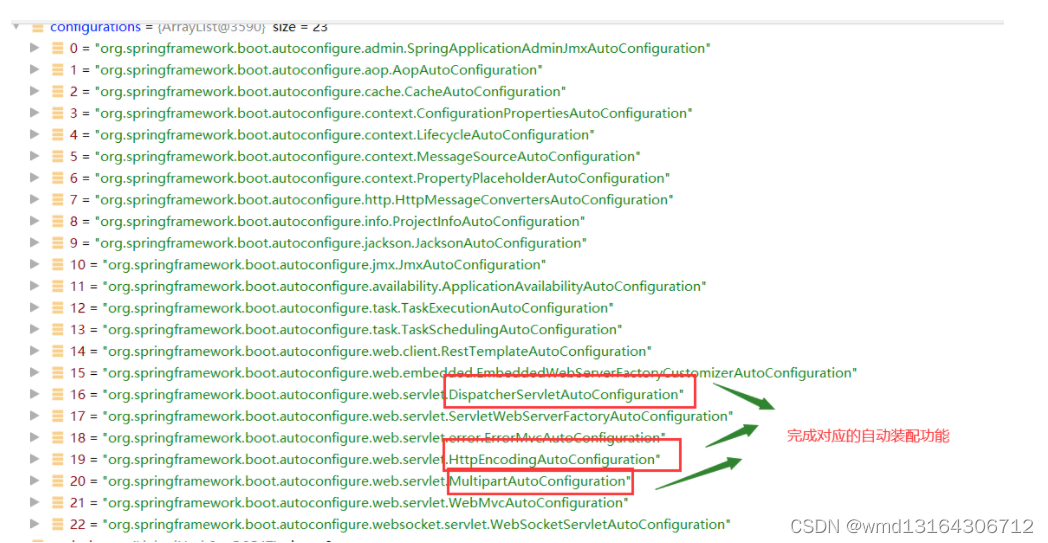
为什么总的自动装配类由127个。因为这些自动装配类都在某个文件中写死了。 
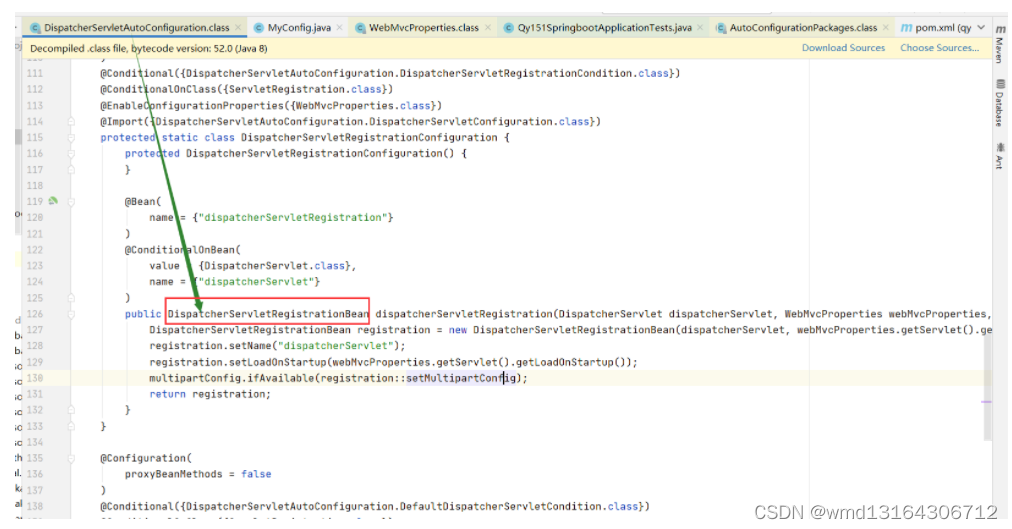
看DispatcherServlet如何完成自动装配。
9. springboot整合数据源
数据源: 指的是数据源。即是: springboot框架连接数据库。
(1)引入依赖
org.springframework.boot spring-boot-starter-jdbc mysql mysql-connector-java (2)配置数据源信息---application.properties
# 配置数据源
 spring.datasource.driver-class-name=com.mysql.cj.jdbc.Driver
 spring.datasource.url=jdbc:mysql://localhost:3306/mydb?serverTimezone=Asia/Shanghai
 spring.datasource.username=root
 spring.datasource.password=root
(3)测试
 @SpringBootTest(classes = Qy151SpringbootApplication.class)
 class Qy151SpringbootApplicationTests {@Autowiredprivate DataSource dataSource;@Testpublic void test01() throws SQLException {//验证了springboot可以帮你完成数据源的自动装配功能System.out.println(dataSource.getConnection());}}
上面默认这个数据源使用的连接池Hikari。如果不想使用默认的连接池,我们可以引入第三方的连接池。
9.1 集成druid数据源
(1)依赖
com.alibaba druid-spring-boot-starter 1.2.8 (2)配置文件
spring.datasource.druid.url=jdbc:mysql://localhost:3306/my0424?serverTimezone=Asia/Shanghai
 spring.datasource.druid.driver-class-name=com.mysql.cj.jdbc.Driver
 spring.datasource.druid.username=root
 spring.datasource.druid.password=13164306712
 #初始化的个数
 spring.datasource.druid.initial-size=5
 # 最大活跃数
 spring.datasource.druid.max-active=10
 # 最大等待时间
 spring.datasource.druid.max-wait=3000
 # 最小的闲置个数
 spring.datasource.druid.min-idle=5
(3)测试
@Autowiredprivate DataSource dataSource;@Testpublic void test01() throws SQLException {//验证了springboot可以帮你完成数据源的自动装配功能System.out.println(dataSource);System.out.println(dataSource.getConnection());}10. springboot整合mybatis
(1)引入mybatis启动依赖类
org.mybatis.spring.boot mybatis-spring-boot-starter 2.2.2 (2) 修改配置文件
#指定映射文件的路径
 mybatis.mapper-locations=classpath:mapper/*.xml
(3)再主启动类加上注解
@SpringBootApplication
 @MapperScan(basePackages = "com.ykq.dao") //为指定的包下的接口生成代理实现类
 public class Qy151SpringbootApplication {public static void main(String[] args) {//加载那含有@SpringBootApplication注解的类,它的特殊之处就是该类使用了@SpringBootApplication ,它是一个复合组件。//@EnableAutoConfigurationSpringApplication.run(Qy151SpringbootApplication.class, args);}}
(4)添加entity ,dao,mapper 后测试
@Autowiredprivate DeptMapper deptMapper;@Testpublic void test02(){System.out.println(deptMapper.findById(1));}11. springboot整合PageHelper分页插件
(1)引入依赖
com.github.pagehelper pagehelper-spring-boot-starter 1.4.2 (2)添加entity ,dao,mapper 后测试:
@Testpublic void test03(){PageHelper.startPage(1, 3);List list = deptMapper.findAll();PageInfo pageInfo=new PageInfo<>(list);System.out.println("当前页码:"+pageInfo.getPageNum());System.out.println("当前总页码:"+pageInfo.getPages());System.out.println("总条数:"+pageInfo.getTotal());System.out.println("当前页码的记录:"+pageInfo.getList());} 11. springboot整合swagger2.
什么是swagger2.
它是一个接口文档----用来前后端分离的一款文档。

(1)引入swagger依赖
com.spring4all swagger-spring-boot-starter 1.9.1.RELEASE com.github.xiaoymin swagger-bootstrap-ui 1.7.8 (2)创建swagger配置类
@Configuration
 public class SwaggerConfiguration {@Beanpublic Docket dacket(){Docket docket = new Docket(DocumentationType.SWAGGER_2).apiInfo(apiInfo())//设置api文档信息.select().apis(RequestHandlerSelectors.basePackage("com.wmd.demo0722.controller")).build();//swagger所有的功能都封装在Docket中return docket;}public ApiInfo apiInfo(){Contact DEFAULT_CONTACT= new Contact("wmd","wmd.com","wmd.qq.com");ApiInfo apiInfo = new ApiInfo("我的抬头", "wmd写的接口","v1.0", "wmd.url", DEFAULT_CONTACT, "Apache .wmd.2.0","wmd.baidu.com", new ArrayList());return apiInfo;}
 }
(3)开启swagger注解
@SpringBootApplication
 @EnableSwagger2//开启swagger注解
 @MapperScan(basePackages = "com.wmd.demo0722.dao")//为指定包下的接口生成代理类
 public class Demo0722Application {public static void main(String[] args) {SpringApplication.run(Demo0722Application.class, args);}}
(4)使用swagger注解
@Api  接口类的注解---接口类上 tag属性
 @ApiOperation  接口方法的注解---接口方法上 value:
 @ApiImplicitParams( 接口参数的说明{ApiImplicitParam() //单个参数的说明}
 )@ApiModel---- 实体类接口注解
 @ApiModelProperty---->实体类属性的说明
(5)访问
第一种: http://localhost:8081/swagger-ui.html
第二种: http://localhost:8081/doc.html
标签:
相关文章
-
无相关信息