Spring Boot 3.x特性-自动配置和自定义Starter
系列文章目录
系列文章:Spring Boot 3.x 系列教程
文章目录
前言
自动配置(Auto-configuration)可以关联到“Starter”,它提供了自动配置代码以及与之一起使用的特有库。
首先介绍构建自己的自动配置所需了解的内容,然后介绍创建自定义Starter所需的典型步骤。
一、自动配置Bean介绍
在底层,自动配置是通过@AutoConfiguration注释实现的。这个注解本身是用@Configuration进行注解的,使得自动配置成为标准的@Configuration类。附加的@Conditional注解用于约束自动配置应用的时间,通常,自动配置类使用@ConditionalOnClass和@ConditionalOnMissingBean注解。这确保了自动配置仅在找到相关类且没有声明,自己创建的@Configuration时才适用。
你可以浏览spring -boot-autoconfigure的源代码来查看Spring提供的@Configuration类(参见AutoConfiguration.imports)。
@Target({ElementType.TYPE})
 @Retention(RetentionPolicy.RUNTIME)
 @Documented
 @Configuration(proxyBeanMethods = false
 )
 @AutoConfigureBefore
 @AutoConfigureAfter
 public @interface AutoConfiguration {}
二、自动配置定位
Spring Boot在发布的jar中检查META-INF/spring/org.springframework.boot.autoconfigure.AutoConfiguration.imports是否存在。该文件应该列出你的配置类,如下所示:
com.mycorp.libx.autoconfigure.LibXAutoConfiguration
 com.mycorp.libx.autoconfigure.LibXWebAutoConfiguration
可以在这个文件中通过#使用注释。
自动配置必须仅以这种方式加载。确保它们是在特定的包空间中定义的,并且它们永远不会成为组件扫描的目标。此外,自动配置类不应该允许组件扫描来查找其他组件。应该使用特定的@Import注解。
如果你的配置需要以特定的顺序应用,你可以使用@AutoConfigureAfter或@AutoConfigureBefore注解。例如,如果你提供了特定于web的配置,你的类可能需要在WebMvcAutoConfiguration之后应用。
@AutoConfigureAfter(value= WebMvcAutoConfiguration.class)
如果使用@AutoConfiguration注释,可以使用before、beforeName、after和afterName属性别名,而不是专用注解。
@AutoConfiguration(after = WebMvcAutoConfiguration.class)
如果你想对任何相互之间没有直接联系的自动配置进行排序,可以使用
你也可以使用@AutoConfigureOrder。该注解具有与常规@Order注释相同的语义,但为自动配置类提供了专用的顺序。与标准的@Configuration类一样,自动配置类的应用顺序只影响它们的bean的定义顺序。随后创建这些bean的顺序不受影响,由每个bean的依赖关系和任何@DependsOn关系决定。
三、条件注解
一般都希望在自动配置类中包含一个或多个@Conditional注解。@ConditionalOnMissingBean注解是一个常见的示例,用于允许开发人员在不满意你的默认设置时覆盖自动配置。
Spring Boot包含许多@Conditional注释,你可以通过注解@Configuration类或单独的@Bean方法在自己的代码中重用这些注释。这些注释包括:
- Class Conditions Bean
- Bean Conditions
- Conditions Property
- Conditions Resource
- Conditions Web Application Conditions
- SpEL Expression Conditions
类条件(Class Conditions Bean )
@ConditionalOnClass和@ConditionalOnMissingClass注解,让@Configuration类包含在特定类的存在或缺失的基础上。因为注解元数据是通过ASM解析的, 你可以使用value属性来引用实际的类,即使这个类可能没有实际出现在正在运行的应用程序类路径上。如果你希望通过String值指定类名,@ConditionalOnClass也可以使用name属性。
@Conditional({OnClassCondition.class})
 public @interface ConditionalOnClass {Class[] value() default {};String[] name() default {};
 }
@Conditional({OnClassCondition.class})
 public @interface ConditionalOnMissingClass {String[] value() default {};
 }
针对于@Bean 方法返回内容作为条件的目标,需要使用单独的 @Configuration隔离条件,如下例子所示:
@AutoConfiguration
 // Some conditions ...
 public class MyAutoConfiguration {// Auto-configured beans ...//需要使用单独的Configuration隔离@Configuration(proxyBeanMethods = false)//Bean 方法返回的值作为条件的目标@ConditionalOnClass(SomeService.class)public static class SomeServiceConfiguration {@Bean@ConditionalOnMissingBeanpublic SomeService someService() {return new SomeService();}}}
如果你使用
@ConditionalOnClass或@ConditionalOnMissingClass作为元注解(注解的注解)的一部分来组合你自己的组合注解,那么在这种情况下必须使用名称来引用类。
Bean条件(Bean Conditions)
@ConditionalOnBean和@ConditionalOnMissingBean注解允许根据特定bean的存在或不存在来包含bean。 你可以使用value属性按类型指定bean,或使用name指定bean。 search属性允许你限制在搜索bean时应该考虑的ApplicationContext层次结构。
当放置在@Bean方法上时,目标类型默认为该方法的返回类型,如下面的示例所示:
@AutoConfiguration
 public class MyAutoConfiguration {@Bean@ConditionalOnMissingBeanpublic SomeService someService() {return new SomeService();}}
上面例子,如果ApplicationContext中没有包含someService类型的bean,则将创建someService bean。
@ConditionalOnBean和@ConditionalOnMissingBean不会阻止@Configuration类的创建。在类级别使用这些条件与使用注解标记每个包含的@Bean方法之间的唯一区别是,如果条件不匹配,前者会阻止将@Configuration类注册为bean。
在声明@Bean方法时,在方法的返回类型中提供尽可能多的类型信息。 例如,如果你的bean的具体类实现了一个接口,那么bean方法的返回类型应该是具体类而不是接口。 在使用bean条件时,在@Bean方法中提供尽可能多的类型信息尤为重要,因为它们的计算只能依赖于方法签名中可用的类型信息。
属性条件(Conditions Property )
@ConditionalOnProperty注解允许基于Spring Environment属性包含的配置。使用前缀和名称属性来指定应该检查的属性。默认情况下,匹配任何存在且不等于false的属性。你还可以使用havingValue和matchIfMissing属性创建更高级的检查。
public @interface ConditionalOnProperty {String[] value() default {};String prefix() default "";String[] name() default {};String havingValue() default "";boolean matchIfMissing() default false;
}value:属性名称的值,与name不可同时使用prefix:配置属性名称的前缀name:属性名称值havingValue:与name组合使用,比较获取到的属性值与havingValue给定的值是否相同,相同才加载配置matchIfMissing: 缺少配置属性时是否可以加载。如果为true,没有该配置属性时也会正常加载;否则不会加载
资源条件(Conditions Resource)
@ConditionalOnResource注解允许只在出现特定资源时才包含配置。资源可以通过使用通常的Spring约定来指定,如下所示的示例:file:/home/user/test.dat。
@Conditional({OnResourceCondition.class})
 public @interface ConditionalOnResource {String[] resources() default {};
 }
例如:
@Bean
 @ConditionalOnResource(resources="file:/home/user/test.dat")
 protected Test loadTestDat()
Web应用程序条件(Conditions Web Application Conditions)
@ConditionalOnWebApplication和@ConditionalOnNotWebApplication注解允许根据应用程序是否是“web应用程序”来包含配置。基于servlet的web应用程序是任何使用Spring WebApplicationContext、定义session作用域或具有ConfigurableWebEnvironment的应用程序。
@ConditionalOnWarDeployment注解允许根据应用程序是否是部署到容器的传统WAR应用程序来包含配置。此条件不适用于使用嵌入式服务器运行的应用程序。
SpEL表达式条件(SpEL Expression Conditions)
@ConditionalOnExpression注解允许基于SpEL表达式的结果包含配置。
@Conditional({OnExpressionCondition.class})
 public @interface ConditionalOnExpression {String value() default "true";
 }
value支持使用SpEL表达式。
四、测试自动配置
五、创建你自己的Starter
典型的Spring Boot Starter包含自动配置和定制给技术的基础设施代码,称之为"acme"。
一个自定义启动器可以包含以下内容:
- 包含“
acme”的自动配置代码的autoconfigure模块。 starter模块提供了对autoconfigure模块的依赖,以及“acme”和其它的附加依赖。
如果“acme”具有多种风格、选项或可选特性,那么最好将自动配置分开,因为您可以清楚地表示一些特性是可选的。
如果自动配置相对简单,并且没有可选特性,那么合并Starter中的两个模块也是一种选择。
命名
自定义Starter你需要确保有一个合适的命名空间。不要用spring-boot命名你的模块名,即使你使用不同的Maven groupId。
假设你正在为“acme”创建starter,并将自动配置模块命名为acme-spring-boot,将starter命名为acme-spring-boot-starter。如果只有一个模块结合了这两个模块,请将其命名为acme-spring-boot-starter。
配置key
如果你的starter提供了配置key,需要确保命名空间唯一。特别是,不要在Spring Boot使用的命名空间中包含你的键(比如:server, management, spring等等)。如果你使用相同的命名空间,我们可能会在将来以破坏模块的方式修改这些命名空间。根据经验,使用你拥有的名称空间(例如acme)为所有键添加前缀。
通过为每个属性添加字段注释,确保配置键被记录下来,如下面的示例所示:
@ConfigurationProperties("acme")
 public class AcmeProperties {/*** Whether to check the location of acme resources.*/private boolean checkLocation = true;/*** Timeout for establishing a connection to the acme server.*/private Duration loginTimeout = Duration.ofSeconds(3);// getters/setters ...}
Spring Boot内部针对配置key描述遵循一下规则:
- 不要使用 “The” 或 "A"开头。
- 对于布尔类型,用“Whether”或“Enable”。
- 对于基于集合的类型,使用“逗号分隔的列表”。
- 使用
java.time.Duration而不是long,并描述与毫秒不同的默认单位,例如“如果未指定持续时间后缀,则将使用seconds”。 - 不要在描述中提供默认值,除非必须在运行时确定。
请确保触发元数据生成,以便对您的密钥也提供IDE帮助元数据配置。你可能需要检查生成的元数据(META-INF/spring-configuration-metadata.json),以确保你的键被正确地记录。
autoconfigure模块
autoconfigure模块包含starter模块库所需的所有内容。它还可能包含配置键定义(例如@ConfigurationProperties)和任何回调接口,这些接口可以用于进一步定制组件的初始化方式。
Spring Boot使用一个注释处理器来收集元数据文件中自动配置的条件(META-INF/ spring-autoconfiguration-metadata.properties)。如果该文件存在,它将用于主动过滤不匹配的自动配置,这将提高启动时间。建议在包含自动配置的模块中添加以下依赖项:
org.springframework.boot spring-boot-autoconfigure-processor true
如果你在应用程序中直接定义了自动配置,确保配置了spring-boot-maven-plugin,以防止重新打包目标将依赖项添加到fat jar中:
org.springframework.boot spring-boot-maven-plugin org.springframework.boot spring-boot-autoconfigure-processor starter 模块
starter模块其实是一个空的jar,。它的唯一目的是提供使用库所需的依赖项。
无论哪种方式,你的启动器必须直接或间接引用核心Spring Boot启动器(spring-boot-starter)(如果你的启动器依赖于另一个启动器,则不需要添加它)。
6.实战
本节自定实战开发一个模拟发送邮件的自定义starter,最终的效果任何其它的项目只需引入starter配置基本的邮件配置,就可以使用SendMailService发送邮件。项目的结构autoconfigure和starter模块分开:

1.新建项目email-spring-boot
添加依赖
org.springframework.boot spring-boot-dependencies 3.0.0-M2 pom import 根项目打包方式为pom
2.新建项目email-spring-boot-autoconfigure
添加依赖:
org.springframework.boot spring-boot-autoconfigure org.springframework.boot spring-boot-configuration-processor true 3.新增配置属性类
@ConfigurationProperties("email.service")
 public class EmailProperties {/*** Enable of email service*/private  boolean enable=true;/*** Host of the email.*/private String host;/*** Port of the email.*/private Integer port;/*** Name of the email.*/private String name;/*** Password of the email.*/private String password;//get set...}
4.新增EmailService Bean
public class EmailService {private EmailProperties mailProperties;public EmailService(EmailProperties mailProperties) {this.mailProperties = mailProperties;}/*** 发送邮件** @param content 邮件发送内容*/public void send(String content) {System.out.println("开始发送邮件:");String info = "基本信息:host:%s,prot:%s";System.out.println(String.format(info, mailProperties.getHost(), mailProperties.getPort()));System.out.println("发送内容:" + content);System.out.println("发送成功!");}
 }
5.新增自动配置EmailAutoConfiguration
@Configuration
 @ConditionalOnClass(EmailService.class)
 @EnableConfigurationProperties(value = EmailProperties.class)
 public class EmailAutoConfiguration {private final EmailProperties mailProperties;public EmailAutoConfiguration(EmailProperties mailProperties) {this.mailProperties = mailProperties;}@Bean@ConditionalOnMissingBean@ConditionalOnProperty(prefix = "email.service", value = "enable",havingValue = "true")public EmailService mailService(EmailProperties mailProperties) {return new EmailService(mailProperties);}
}当EmailService类存在并且email.service.enable等于true且EmailService bean不存在,自动配置会自动注入EmailService bean。
6.新增项目email-spring-boot-starter
添加依赖
org.example email-spring-boot-autoconfigure 1.0-SNAPSHOT email-spring-boot-starter模块主要是集成email-spring-boot-autoconfigure,以及一些其它的依赖项。
7.测试
新增测试项目 email-starter-test,添加依赖:
org.example email-spring-boot-starter 1.0-SNAPSHOT org.springframework.boot spring-boot-starter-test test 配置属性:
email.service.enable=true
 email.service.host=mail.qq.com
 email.service.port=123
 email.service.name=admin
 email.service.password=admin
@SpringBootTest
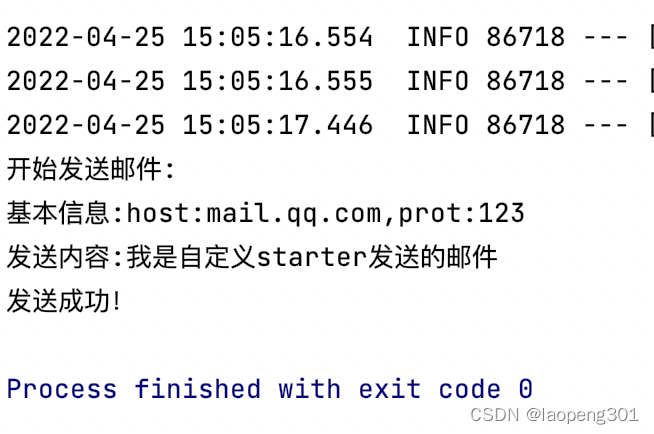
 class EmailStarterTestApplicationTests {@Autowiredprivate EmailService emailService;@Testvoid contextLoads() {emailService.send("我是自定义starter发送的邮件");}
 }
测试结果:

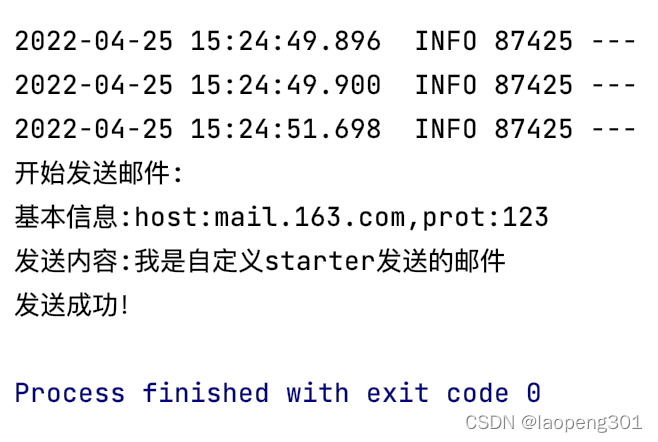
更换配置:
email.service.enable=true
 email.service.host=mail.163.com
 email.service.port=123
 email.service.name=admin
 email.service.password=admin
测试结果:

总结
本节介绍了自动配置和自定义starter是Spring Boot的核心功能,也是它的特色。
标签:
相关文章
-
无相关信息
