Android中常见的热门标签的流式布局的实现
享受技术带来的快乐!
不管前方的路有多远和多苦,只要走的方向是正确的,不管多么崎岖不平,都比站在原地更接近幸福!
Bitbucket 让 pull request变得更强大,可即刻提升团队代码质量 云计算行业圆桌论坛 前端精品课程免费看,写课评赢心动大礼!Android中常见的热门标签的流式布局的实现
2015-04-14 14:48 9999人阅读 评论(15) 收藏 举报目录(?)[+]
一、概述:
在日常的app使用中,我们会在android 的app中看见 热门标签等自动换行的流式布局,今天,我们就来看看如何
自定义一个类似热门标签那样的流式布局吧(源码下载在下面最后给出)
类似的自定义布局。下面我们就来详细介绍流式布局的应用特点以及用的的技术点:
1.流式布局的特点以及应用场景
特点:当上面一行的空间不够容纳新的TextView时候,
才开辟下一行的空间
原理图:
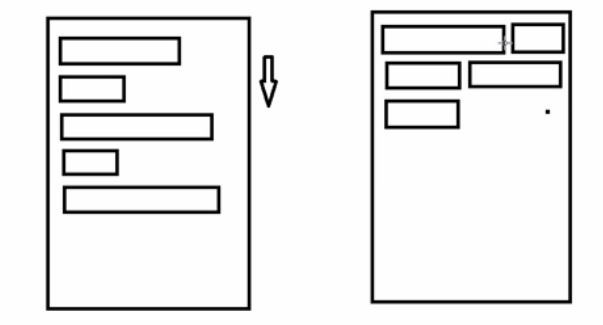
场景:主要用于关键词搜索或者热门标签等场景
2.自定义ViewGroup,重点重写下面两个方法
1、onMeasure:测量子view的宽高,设置自己的宽和高
2、onLayout:设置子view的位置
onMeasure:根据子view的布局文件中属性,来为子view设置测量模式和测量值
测量=测量模式+测量值;
测量模式有3种:
EXACTLY:表示设置了精确的值,一般当childView设置其宽、高为精确值、match_parent时,ViewGroup会将其设置为EXACTLY;
AT_MOST:表示子布局被限制在一个最大值内,一般当childView设置其宽、高为wrap_content时,ViewGroup会将其设置为AT_MOST;
UNSPECIFIED:表示子布局想要多大就多大,一般出现在AadapterView的item的heightMode中、ScrollView的childView的heightMode中;此种模式比较少见。
3.LayoutParams
ViewGroup LayoutParams :每个 ViewGroup 对应一个 LayoutParams; 即 ViewGroup -> LayoutParams
getLayoutParams 不知道转为哪个对应的LayoutParams ,其实很简单,就是如下:
子View.getLayoutParams 得到的LayoutParams对应的就是 子View所在的父控件的LayoutParams;
例如,LinearLayout 里面的子view.getLayoutParams ->LinearLayout.LayoutParams
所以 咱们的FlowLayout 也需要一个LayoutParams,由于上面的效果图是子View的 margin,
所以应该使用MarginLayoutParams。即FlowLayout->MarginLayoutParams
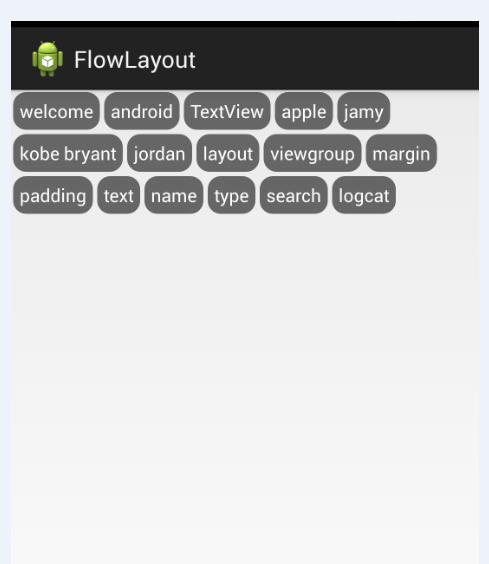
4.最后来看看实现的最终效果图:
二、热门标签的流式布局的实现:
1. 自定义热门标签的ViewGroup实现
根据上面的技术分析,自定义类继承于ViewGroup,并重写 onMeasure和onLayout等方法。具体实现代码如下:
[plain] view plain copy
- package com.czm.flowlayout;
- import java.util.ArrayList;
- import java.util.List;
- import android.content.Context;
- import android.util.AttributeSet;
- import android.view.View;
- import android.view.ViewGroup;
- /**
- *
- * @author caizhiming
- * @created on 2015-4-13
- */
- public class XCFlowLayout extends ViewGroup{
- //存储所有子View
- private List
- //每一行的高度
- private List
mLineHeight = new ArrayList<>(); - public XCFlowLayout(Context context) {
- this(context, null);
- // TODO Auto-generated constructor stub
- }
- public XCFlowLayout(Context context, AttributeSet attrs) {
- this(context, attrs, 0);
- // TODO Auto-generated constructor stub
- }
- public XCFlowLayout(Context context, AttributeSet attrs, int defStyle) {
- super(context, attrs, defStyle);
- // TODO Auto-generated constructor stub
- }
- @Override
- protected void onMeasure(int widthMeasureSpec, int heightMeasureSpec) {
- // TODO Auto-generated method stub
- //父控件传进来的宽度和高度以及对应的测量模式
- int sizeWidth = MeasureSpec.getSize(widthMeasureSpec);
- int modeWidth = MeasureSpec.getMode(widthMeasureSpec);
- int sizeHeight = MeasureSpec.getSize(heightMeasureSpec);
- int modeHeight = MeasureSpec.getMode(heightMeasureSpec);
- //如果当前ViewGroup的宽高为wrap_content的情况
- int width = 0;//自己测量的 宽度
- int height = 0;//自己测量的高度
- //记录每一行的宽度和高度
- int lineWidth = 0;
- int lineHeight = 0;
- //获取子view的个数
- int childCount = getChildCount();
- for(int i = 0;i < childCount; i ++){
- View child = getChildAt(i);
- //测量子View的宽和高
- measureChild(child, widthMeasureSpec, heightMeasureSpec);
- //得到LayoutParams
- MarginLayoutParams lp = (MarginLayoutParams) getLayoutParams();
- //子View占据的宽度
- int childWidth = child.getMeasuredWidth() + lp.leftMargin + lp.rightMargin;
- //子View占据的高度
- int childHeight = child.getMeasuredHeight() + lp.topMargin + lp.bottomMargin;
- //换行时候
- if(lineWidth + childWidth > sizeWidth){
- //对比得到最大的宽度
- width = Math.max(width, lineWidth);
- //重置lineWidth
- lineWidth = childWidth;
- //记录行高
- height += lineHeight;
- lineHeight = childHeight;
- }else{//不换行情况
- //叠加行宽
- lineWidth += childWidth;
- //得到最大行高
- lineHeight = Math.max(lineHeight, childHeight);
- }
- //处理最后一个子View的情况
- if(i == childCount -1){
- width = Math.max(width, lineWidth);
- height += lineHeight;
- }
- }
- //wrap_content
- setMeasuredDimension(modeWidth == MeasureSpec.EXACTLY ? sizeWidth : width,
- modeHeight == MeasureSpec.EXACTLY ? sizeHeight : height);
- super.onMeasure(widthMeasureSpec, heightMeasureSpec);
- }
- @Override
- protected void onLayout(boolean changed, int l, int t, int r, int b) {
- // TODO Auto-generated method stub
- mAllChildViews.clear();
- mLineHeight.clear();
- //获取当前ViewGroup的宽度
- int width = getWidth();
- int lineWidth = 0;
- int lineHeight = 0;
- //记录当前行的view
- List
lineViews = new ArrayList (); - int childCount = getChildCount();
- for(int i = 0;i < childCount; i ++){
- View child = getChildAt(i);
- MarginLayoutParams lp = (MarginLayoutParams) child.getLayoutParams();
- int childWidth = child.getMeasuredWidth();
- int childHeight = child.getMeasuredHeight();
- //如果需要换行
- if(childWidth + lineWidth + lp.leftMargin + lp.rightMargin > width){
- //记录LineHeight
- mLineHeight.add(lineHeight);
- //记录当前行的Views
- mAllChildViews.add(lineViews);
- //重置行的宽高
- lineWidth = 0;
- lineHeight = childHeight + lp.topMargin + lp.bottomMargin;
- //重置view的集合
- lineViews = new ArrayList();
- }
- lineWidth += childWidth + lp.leftMargin + lp.rightMargin;
- lineHeight = Math.max(lineHeight, childHeight + lp.topMargin + lp.bottomMargin);
- lineViews.add(child);
- }
- //处理最后一行
- mLineHeight.add(lineHeight);
- mAllChildViews.add(lineViews);
- //设置子View的位置
- int left = 0;
- int top = 0;
- //获取行数
- int lineCount = mAllChildViews.size();
- for(int i = 0; i < lineCount; i ++){
- //当前行的views和高度
- lineViews = mAllChildViews.get(i);
- lineHeight = mLineHeight.get(i);
- for(int j = 0; j < lineViews.size(); j ++){
- View child = lineViews.get(j);
- //判断是否显示
- if(child.getVisibility() == View.GONE){
- continue;
- }
- MarginLayoutParams lp = (MarginLayoutParams) child.getLayoutParams();
- int cLeft = left + lp.leftMargin;
- int cTop = top + lp.topMargin;
- int cRight = cLeft + child.getMeasuredWidth();
- int cBottom = cTop + child.getMeasuredHeight();
- //进行子View进行布局
- child.layout(cLeft, cTop, cRight, cBottom);
- left += child.getMeasuredWidth() + lp.leftMargin + lp.rightMargin;
- }
- left = 0;
- top += lineHeight;
- }
- }
- /**
- * 与当前ViewGroup对应的LayoutParams
- */
- @Override
- public LayoutParams generateLayoutParams(AttributeSet attrs) {
- // TODO Auto-generated method stub
- return new MarginLayoutParams(getContext(), attrs);
- }
- }
2.相关的布局文件:
引用自定义控件:
[plain] view plain copy
-
- xmlns:tools="http://schemas.android.com/tools"
- android:id="@+id/container"
- android:layout_width="match_parent"
- android:layout_height="match_parent" >
- android:id="@+id/flowlayout"
- android:layout_width="match_parent"
- android:layout_height="match_parent" >
TextView的样式文件:
[plain] view plain copy
-
-
-
-
- android:left="5dp"
- android:right="5dp"
- android:top="5dp"
- android:bottom="5dp"
- />
三、使用该自定义布局控件类
最后,如何使用该自定义的热门标签控件类呢?很简单,请看下面实例代码:
[plain] view plain copy
- package com.czm.flowlayout;
- import android.app.Activity;
- import android.graphics.Color;
- import android.os.Bundle;
- import android.view.ViewGroup.LayoutParams;
- import android.view.ViewGroup.MarginLayoutParams;
- import android.widget.TextView;
- /**
- *
- * @author caizhiming
- * @created on 2015-4-13
- */
- public class MainActivity extends Activity {
- private String mNames[] = {
- "welcome","android","TextView",
- "apple","jamy","kobe bryant",
- "jordan","layout","viewgroup",
- "margin","padding","text",
- "name","type","search","logcat"
- };
- private XCFlowLayout mFlowLayout;
- @Override
- protected void onCreate(Bundle savedInstanceState) {
- super.onCreate(savedInstanceState);
- setContentView(R.layout.activity_main);
- initChildViews();
- }
- private void initChildViews() {
- // TODO Auto-generated method stub
- mFlowLayout = (XCFlowLayout) findViewById(R.id.flowlayout);
- MarginLayoutParams lp = new MarginLayoutParams(
- LayoutParams.WRAP_CONTENT,LayoutParams.WRAP_CONTENT);
- lp.leftMargin = 5;
- lp.rightMargin = 5;
- lp.topMargin = 5;
- lp.bottomMargin = 5;
- for(int i = 0; i < mNames.length; i ++){
- TextView view = new TextView(this);
- view.setText(mNames[i]);
- view.setTextColor(Color.WHITE);
- view.setBackgroundDrawable(getResources().getDrawable(R.drawable.textview_bg));
- mFlowLayout.addView(view,lp);
- }
- }
- }
四、源码下载
最后给出源码的下载:http://download.csdn.net/detail/jdsjlzx/8784571
这里引用另一个高手的实现,
摘要
新项目用到了一种全新布局————Android标签流式布局的功能,正好一直说给大家讲自定义控件的实现,今天就为大家讲一种android流式布局的实现。本文原创,转载请注明地址: http://blog.kymjs.com/
正文
在日常的app使用中,我们会在android 的app中看见热门标签等自动换行的流式布局,今天,我们就来看看如何自定义一个类似热门标签那样的流式布局吧(源码下载在下面最后给出)

这个控件并不是我实现的,代码是从网上搜流式布局找到的。我只是为大家讲解一下实现过程以及原理。
先看代码
public class FlowLayout extends ViewGroup {private float mVerticalSpacing; //每个item纵向间距private float mHorizontalSpacing; //每个item横向间距public FlowLayout(Context context) {super(context);}public FlowLayout(Context context, AttributeSet attrs) {super(context, attrs);}public void setHorizontalSpacing(float pixelSize) {mHorizontalSpacing = pixelSize;}public void setVerticalSpacing(float pixelSize) {mVerticalSpacing = pixelSize;}@Overrideprotected void onMeasure(int widthMeasureSpec, int heightMeasureSpec) {int selfWidth = resolveSize(0, widthMeasureSpec);int paddingLeft = getPaddingLeft();int paddingTop = getPaddingTop();int paddingRight = getPaddingRight();int paddingBottom = getPaddingBottom();int childLeft = paddingLeft;int childTop = paddingTop;int lineHeight = 0;//通过计算每一个子控件的高度,得到自己的高度for (int i = 0, childCount = getChildCount(); i < childCount; ++i) {View childView = getChildAt(i);LayoutParams childLayoutParams = childView.getLayoutParams();childView.measure(getChildMeasureSpec(widthMeasureSpec, paddingLeft + paddingRight,childLayoutParams.width),getChildMeasureSpec(heightMeasureSpec, paddingTop + paddingBottom,childLayoutParams.height));int childWidth = childView.getMeasuredWidth();int childHeight = childView.getMeasuredHeight();lineHeight = Math.max(childHeight, lineHeight);if (childLeft + childWidth + paddingRight > selfWidth) {childLeft = paddingLeft;childTop += mVerticalSpacing + lineHeight;lineHeight = childHeight;} else {childLeft += childWidth + mHorizontalSpacing;}}int wantedHeight = childTop + lineHeight + paddingBottom;setMeasuredDimension(selfWidth, resolveSize(wantedHeight, heightMeasureSpec));}@Overrideprotected void onLayout(boolean changed, int l, int t, int r, int b) {int myWidth = r - l;int paddingLeft = getPaddingLeft();int paddingTop = getPaddingTop();int paddingRight = getPaddingRight();int childLeft = paddingLeft;int childTop = paddingTop;int lineHeight = 0;//根据子控件的宽高,计算子控件应该出现的位置。for (int i = 0, childCount = getChildCount(); i < childCount; ++i) {View childView = getChildAt(i);if (childView.getVisibility() == View.GONE) {continue;}int childWidth = childView.getMeasuredWidth();int childHeight = childView.getMeasuredHeight();lineHeight = Math.max(childHeight, lineHeight);if (childLeft + childWidth + paddingRight > myWidth) {childLeft = paddingLeft;childTop += mVerticalSpacing + lineHeight;lineHeight = childHeight;}childView.layout(childLeft, childTop, childLeft + childWidth, childTop + childHeight);childLeft += childWidth + mHorizontalSpacing;}}
 }
从控件创建过程说起
- 当这个流式布局在被加载如内存并显示在屏幕上这一过程中,首先会调用view.measure(w,h)这个方法,表示测量view的宽度与高度,其中参数w与h分别表示这个控件的父控件的宽高。
- 在view.measure()方法的调用过程中又会调用view本身的一个回调方法,onMeasure(),这个是view自身的一个回调方法,用于让开发者在自定义View的时候重新计算自身的大小。一般会在这个方法中循环遍历,计算出这个控件的全部子孙控件的宽高。
- 在View的宽高计算完成以后,考虑将这个控件显示到屏幕的指定位置上,此时view的onLayout()方法会被调用。 一般同时会在这个方法中计算出全部子孙控件在这个控件中的位置。
可能基本流程有些枯燥,接下来结合代码看看。
流布局的实现
看到onMeasure()方法中的这段: //通过计算每一个子控件的高度,得到自己的高度
for (int i = 0, childCount = getChildCount(); i < childCount; ++i) {View childView = getChildAt(i);LayoutParams childLayoutParams = childView.getLayoutParams();childView.measure(getChildMeasureSpec(widthMeasureSpec, paddingLeft + paddingRight,childLayoutParams.width),getChildMeasureSpec(heightMeasureSpec, paddingTop + paddingBottom,childLayoutParams.height));int childWidth = childView.getMeasuredWidth();int childHeight = childView.getMeasuredHeight();lineHeight = Math.max(childHeight, lineHeight);if (childLeft + childWidth + paddingRight > selfWidth) {childLeft = paddingLeft;childTop += mVerticalSpacing + lineHeight;lineHeight = childHeight;} else {childLeft += childWidth + mHorizontalSpacing;}} 首先通过循环,遍历这个控件的所有子控件,同时调用子控件的measure()方法,这时measure方法的两个参数是控件能给这个子控件的最大宽高(我们都知道的,子控件再大,显示的大小也不能比父控件还大)。这里getChildMeasureSpec()方法的作用是用来计算一个合适子视图的尺寸大小(宽度或者高度),结合我们从子视图的LayoutParams所给出的MeasureSpec信息来获取最合适的结果。比如,如果这个View知道自己的大小尺寸(因为它本身的MeasureSpec的model为Exactly,)并且子视图的大小恰好跟父窗口一样大,父窗口必须用给定的大小去layout子视图
参数含义:spec 父窗口传递给子视图的大小和模式
padding 父窗口的边距,也就是xml中的android:padding
childDimension 子视图想要绘制的准确大小,但最终不一定绘制此值
当得到了每一个子控件的大小以后,再要计算自己的宽高就简单了。
int wantedHeight = childTop + lineHeight + paddingBottom;
同理,在onLayout中的这一句
for (int i = 0, childCount = getChildCount(); i < childCount; ++i) {View childView = getChildAt(i);if (childView.getVisibility() == View.GONE) {continue;}int childWidth = childView.getMeasuredWidth();int childHeight = childView.getMeasuredHeight();lineHeight = Math.max(childHeight, lineHeight);if (childLeft + childWidth + paddingRight > myWidth) {childLeft = paddingLeft;childTop += mVerticalSpacing + lineHeight;lineHeight = childHeight;}childView.layout(childLeft, childTop, childLeft + childWidth, childTop + childHeight);childLeft += childWidth + mHorizontalSpacing;} 首先通过循环遍历,控制每个item子控件的显示位置,如果当前行还能放得下一个item,就放到当前行,如果放不下就放到下一行的最左边。
最终,遍历完成,也就相当于把自己的位置显示完成了。
效果截图

- 顶
- 0
- 踩
- 0
我的同类文章
更多文章- 猜你在找
- 精讲精练_参悟Android核心技术
- Android底层技术:Java层系统服务(Android Service)
- Android底层技术:Linux驱动框架与开发
- Android应用的调试
- Android平台技术:JNI开发初步
- 11楼 Focus100 前天 14:08发表 [回复]
-

- 我简化了不少代码,效果一样,大家可以参考这篇:
http://blog.csdn.net/u013519989/article/details/50834180
- 10楼 huidawoxiaozi 2016-02-03 15:36发表 [回复]
-

- 放在scrollview冲突 :算出总高度,重新再设置一遍高度也可解决ViewGroup.LayoutParams params = flowlayout.getLayoutParams();
params.height = totalHeight;
flowlayout.setLayoutParams(params);
在界面加载完在这个方法里得到总高度public void onWindowFocusChanged(boolean hasFocus) {
- 9楼 路路路lbj 2016-01-05 10:39发表 [回复]
-

- 我的上下两行之间没有margin,可能是什么原因
- 8楼 o2jam0916 2015-11-17 19:56发表 [回复]
-

- 你好大神,我想问一下,我把这个标签流放大ListView中 就不显示了 是什么原因呢?求解 多谢
- 7楼 爱的不落叶 2015-10-26 13:55发表 [回复]
-

- 重写onMeasure方法最后不能调用父类的onMeasure方法。否则无法wrap_content。
- 6楼 yantaossg 2015-10-15 15:34发表 [回复]
-

- 非常感谢,提供的代码。
我想请问下,有没有办法。让每次新生成的标签背景颜色都不一样!
- 5楼 yunuoqzone19 2015-10-12 19:19发表 [回复]
-

- 解决自适应高度的方法是在onMeasure方法中 计算出高度调用setMeasuredDimension方法重新设置高度即可
- 4楼 AlexSucre 2015-09-08 11:11发表 [回复]
-

- 我想问一下,如果我想设置里面的文字居中显示怎么办?我现在想把这个每一个标签设置的比较大,然后居中显示
- 3楼 3kqing 2015-07-30 18:20发表 [回复]
-

- 这个布局放到ScrollView中不显示怎么办呢?XCFlowLayout如果高度设为wrap_content就不能显示。设为固定值才显示。有什么办法能让他设为wrap_content也显示呢?
- Re: hzp901203 2015-08-18 13:54发表 [回复]
-

- 回复3kqing:把super.onMeasure(widthMeasureSpec, heightMeasureSpec);删掉就行了,并且将onMeasure里面的MarginLayoutParams lp = (MarginLayoutParams) getLayoutParams(); 改成MarginLayoutParams lp =(MarginLayoutParams) child.getLayoutParams();,不然高度算的不对
- Re: 596174 2015-11-06 15:17发表 [回复]
-

- 回复hzp901203:谢谢,这才是正解
-
-
- 2楼 又丑又不读书 2015-07-20 10:50发表 [回复]
-

- 这个布局放到ScrollView中不显示怎么办呢?XCFlowLayout如果高度设为wrap_content就不能显示。设为固定值才显示。有什么办法能让他设为wrap_content也显示呢?我是刚毕业的学生,项目中用到这个,弄了几天都解决不了。麻烦帮看下呢,谢谢了
- Re: 一叶飘舟 2015-07-20 11:14发表 [回复]
-

- 回复又丑又不读书:下载这个代码:http://download.csdn.net/download/jdsjlzx/8784571
- Re: yunuoqzone19 2015-10-12 20:11发表 [回复]
-
- 回复一叶飘舟:你这个还是没有解决自适应高度的问题 你哪个是设置的最大高度 - -。
-
-
- 1楼 又丑又不读书 2015-07-20 10:49发表 [回复]
-
- 这个布局放到ScrollView中不显示怎么办呢?XCFlowLayout如果高度设为wrap_content就不能显示。设为固定值才显示。有什么办法能让他设为wrap_content也显示呢?我是刚毕业的学生,项目中用到这个,弄了几天都解决不了。麻烦帮看下呢,谢谢了
核心技术类目
全部主题 Hadoop AWS 移动游戏 Java Android iOS Swift 智能硬件 Docker OpenStack VPN Spark ERP IE10 Eclipse CRM JavaScript 数据库 Ubuntu NFC WAP jQuery BI HTML5 Spring Apache .NET API HTML SDK IIS Fedora XML LBS Unity Splashtop UML components Windows Mobile Rails QEMU KDE Cassandra CloudStack FTC coremail OPhone CouchBase 云计算 iOS6 Rackspace Web App SpringSide Maemo Compuware 大数据 aptech Perl Tornado Ruby Hibernate ThinkPHP HBase Pure Solr Angular Cloud Foundry Redis Scala Django Bootstrap- 原创:580篇
- 转载:1430篇
- 译文:7篇
- 评论:1048条
- 公司简介 | 招贤纳士 | 广告服务 | 银行汇款帐号 | 联系方式 | 版权声明 | 法律顾问 | 问题报告 | 合作伙伴 | 论坛反馈
- 网站客服 杂志客服 微博客服 webmaster@csdn.net 400-600-2320 | 北京创新乐知信息技术有限公司 版权所有 | 江苏乐知网络技术有限公司 提供商务支持
- 京 ICP 证 09002463 号 | Copyright © 1999-2014, CSDN.NET, All Rights Reserved

标签:
相关文章
-
无相关信息