Android中滑屏初探 ---- scrollTo 以及 scrollBy方法使用说明
本文原创 ,转载必须注明出处 :http://blog.csdn.net/qinjuning
今天给大家介绍下Android中滑屏功能的一个基本实现过程以及原理初探,最后给大家重点讲解View视图中scrollTo 与
scrollBy这两个函数的区别 。
首先 ,我们必须明白在Android View视图是没有边界的,Canvas是没有边界的,只不过我们通过绘制特定的View时对
Canvas对象进行了一定的操作,例如 : translate(平移)、clipRect(剪切)等,以便达到我们的对该Canvas对象绘制的要求 ,
我们可以将这种无边界的视图称为“视图坐标”-----它不受物理屏幕限制。通常我们所理解的一个Layout布局文件只是该视
图的显示区域,超过了这个显示区域将不能显示到父视图的区域中 ,对应的,我们可以将这种有边界的视图称为“布局坐标”
------ 父视图给子视图分配的布局(layout)大小。而且, 一个视图的在屏幕的起始坐标位于视图坐标起始处,如下图所示。
这么来说吧 ,世界本是无边无界的,可是我们的眼睛我们的心约束了我们所看到的“世界” 。
如下所示:
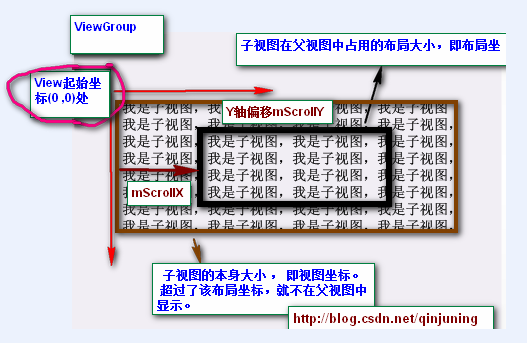
黑色框框表示该子视图的布局坐标, 褐色框框表示该子视图的视图坐标--该坐标是无限的,超过了父视图给子视图
规定的区域后,不再显示该超出内容。
那么下面的问题就是:如何将我们的视图的任意坐标能显示到该视图的中心坐标上呢? 由于该布局位置是只能显示特定的
一块视图内容 ,因此我们需要通过scrollTo()或者scrollBy()方法将我们期望的视图“滚动”至布局坐标上。
在View.java中提供了了如下两个变量以及相应的属性方法去读取滚动值 ,如下: View.java类中
/*** The offset, in pixels, by which the content of this view is scrolled* horizontally.* {@hide}*/protected int mScrollX; //该视图内容相当于视图起始坐标的偏移量 , X轴 方向/*** The offset, in pixels, by which the content of this view is scrolled* vertically.* {@hide}*/protected int mScrollY; //该视图内容相当于视图起始坐标的偏移量 , Y轴方向/*** Return the scrolled left position of this view. This is the left edge of* the displayed part of your view. You do not need to draw any pixels* farther left, since those are outside of the frame of your view on* screen.** @return The left edge of the displayed part of your view, in pixels.*/public final int getScrollX() {return mScrollX;}/*** Return the scrolled top position of this view. This is the top edge of* the displayed part of your view. You do not need to draw any pixels above* it, since those are outside of the frame of your view on screen.** @return The top edge of the displayed part of your view, in pixels.*/public final int getScrollY() {return mScrollY;}
注意,所谓的“by which the content of this view is scrolled”表示该偏移量只针对于该View中onDraw()方法里的
具体内容实现,而不针对绘制背景图片等 。具体原因可参考
提示:下文中提到的当前视图内容是在绘制在布局坐标处的内容。
public void scrollTo(int x, int y)
说明:在当前视图内容偏移至(x , y)坐标处,即显示(可视)区域位于(x , y)坐标处。
方法原型为: View.java类中
/*** Set the scrolled position of your view. This will cause a call to* {@link #onScrollChanged(int, int, int, int)} and the view will be* invalidated.* @param x the x position to scroll to* @param y the y position to scroll to*/public void scrollTo(int x, int y) {//偏移位置发生了改变if (mScrollX != x || mScrollY != y) {int oldX = mScrollX;int oldY = mScrollY;mScrollX = x; //赋新值,保存当前便宜量mScrollY = y;//回调onScrollChanged方法onScrollChanged(mScrollX, mScrollY, oldX, oldY);if (!awakenScrollBars()) {invalidate(); //一般都引起重绘}}}
public void scrollBy(int x, int y)
说明:在当前视图内容继续偏移(x , y)个单位,显示(可视)区域也跟着偏移(x,y)个单位。
方法原型为: View.java类中
/*** Move the scrolled position of your view. This will cause a call to* {@link #onScrollChanged(int, int, int, int)} and the view will be* invalidated.* @param x the amount of pixels to scroll by horizontally* @param y the amount of pixels to scroll by vertically*/// 看出原因了吧 。。 mScrollX 与 mScrollY 代表我们当前偏移的位置 , 在当前位置继续偏移(x ,y)个单位public void scrollBy(int x, int y) {scrollTo(mScrollX + x, mScrollY + y);}
第一个小Demo非常简单 ,大家重点理解与掌握scrollTo() 与 scrollBy()函数的用法和区别。
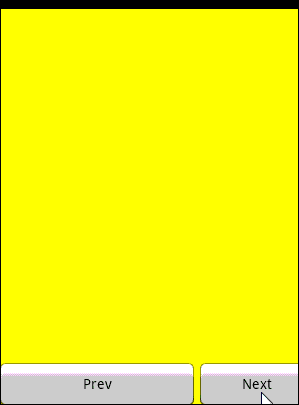
第二个小Demo则有了Launcher的模样,能够左右切换屏幕 。实现功能如下: 采用了一个自定义ViewGroup,该ViewGroup
对象包含了3个LinearLayout子视图,并且以一定的布局坐标(由layout()方法指定)显示在ViewGroup上。 接下来,即可调用该
ViewGroup对象的scrollTo或者scrollBy()方法切换指定视图内容了,即切换屏幕。 呵呵 ,挺好玩的吧 。
如果对View绘制流程不懂的,可以参考我的这篇博客
截图如下:
自定义ViewGroup如下:
//自定义ViewGroup , 包含了三个LinearLayout控件,存放在不同的布局位置,通过scrollBy或者scrollTo方法切换
 public class MultiViewGroup extends ViewGroup {private Context mContext;private static String TAG = "MultiViewGroup";public MultiViewGroup(Context context) {super(context);mContext = context;init();}public MultiViewGroup(Context context, AttributeSet attrs) {super(context, attrs);mContext = context;init();}private void init() {// 初始化3个 LinearLayout控件LinearLayout oneLL = new LinearLayout(mContext);oneLL.setBackgroundColor(Color.RED);addView(oneLL);LinearLayout twoLL = new LinearLayout(mContext);twoLL.setBackgroundColor(Color.YELLOW);addView(twoLL);LinearLayout threeLL = new LinearLayout(mContext);threeLL.setBackgroundColor(Color.BLUE);addView(threeLL);}// measure过程@Overrideprotected void onMeasure(int widthMeasureSpec, int heightMeasureSpec) {Log.i(TAG, "--- start onMeasure --");// 设置该ViewGroup的大小int width = MeasureSpec.getSize(widthMeasureSpec);int height = MeasureSpec.getSize(heightMeasureSpec);setMeasuredDimension(width, height);int childCount = getChildCount();Log.i(TAG, "--- onMeasure childCount is -->" + childCount);for (int i = 0; i < childCount; i++) {View child = getChildAt(i);// 设置每个子视图的大小 , 即全屏child.measure(MultiScreenActivity.screenWidth, MultiScreenActivity.scrrenHeight);}}// layout过程@Overrideprotected void onLayout(boolean changed, int l, int t, int r, int b) {// TODO Auto-generated method stubLog.i(TAG, "--- start onLayout --");int startLeft = 0; // 每个子视图的起始布局坐标int startTop = 10; // 间距设置为10px 相当于 android:marginTop= "10px"int childCount = getChildCount();Log.i(TAG, "--- onLayout childCount is -->" + childCount);for (int i = 0; i < childCount; i++) {View child = getChildAt(i);child.layout(startLeft, startTop, startLeft + MultiScreenActivity.screenWidth, startTop + MultiScreenActivity.scrrenHeight);startLeft = startLeft + MultiScreenActivity.screenWidth ; //校准每个子View的起始布局位置//三个子视图的在屏幕中的分布如下 [0 , 320] / [320,640] / [640,960]}}}
PS :大家可以分别给这几个LinearLayout试着添加几个子View,例如TextView, Button等。
至于Launcher上滑屏功能的实现,我尝试着去掌握,可能天资愚钝吧,对Scoller类很是感冒,现今还没有掌握好,不过在此
给大家推荐几个不错的学习资源 。 以后有需要的话,还是采用拿来主义吧。 囧
1、 Scoller类介绍:android 中文 api (64) —— Scroller
2、相关资源汇总:http://blog.csdn.net/dellheng/article/details/7164275
3,launcher修改--左右滑动屏幕切换源码追踪
示例源代码位于: http://download.csdn.net/detail/qinjuning/4054840
补充(收回上面一段话,- -):关于如何实现触摸滑屏---- 仿Launcher滑屏以及Scoller类的使用,请参阅我的
另外一篇博文: 《 Android中滑屏实现----手把手教你如何实现触摸滑屏以及Scroller类详解》
标签:
相关文章
-
无相关信息