springMVC系列之与spring的整合——07
springMVC系列之与spring的整合——07
摘要:本文是实现springMVC与spring的整合、springMVC作为spring的一部分、与spring整合是很容易实现、同时附带一些关于wem.xml中配置加载的顺序、和获取springMVC上下文、spring上下文、并验证他们之间的关系。
一:本文内容
1、web.xml中配置的加载顺序
2、springMVC与spring的整合
3、spring与springMVC整合相比于struts2与spring整合的不同之处
4、ServletContext、spring上下文、springMVC上下文关系
5、获取ServletContext、spring上下文、springMVC上下文关系以及验证他们之间的关系。
二:具体实现
1、web.xml中配置的加载顺序:
a)
b)
c)
d)
2、springMVC与spring的整合
a) jar包——无需引入、使用springMVC框架的jar就行!
b) web.xml中加载spring的配置文件:使用
c) web.xml中配置spring的Listener
d) 在spring的配置文件:applicationContext.xml(我项目中是用的springAnnotation-core.xml)配置文件中配置bean、如同使用struts2时为其一个action注入属性一样、这里是用于注入一个或者多个Controller中。值得注意的是:这里不再需要对Controller配置bean、因为他在服务器启动的时候就已经生成了、而不像struts2还要配置action的bean。
e) 在需要使用spring生成的bean实体类的Controller中使用注解的形式获取实例、相对于struts2的action、不再需要此注入属性生成get、set方法。、
f) 最后:Just use it!
3、 与struts2相比:
a) 不用spring在为我们生成action实例、对应的springMVC中的Controller已经在服务器启动的时候实例化好了。
b) 注入属性的时候不再像struts2那样为bean配置的action使用
c) 调用某个接口中的方法的时候、相对于struts2的为调用接口的引用生成get、set方法、springMVC的注解显的高大上。
4、ServletContext、spring上下文、springMVC上下文关系:
springMVC上下文继承spring上下文继承ServletContext
5、获取ServletContext、spring上下文、springMVC上下文关系以及验证他们之间的关系
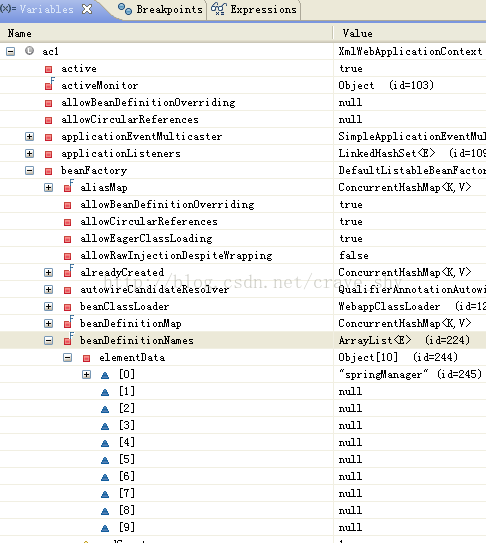
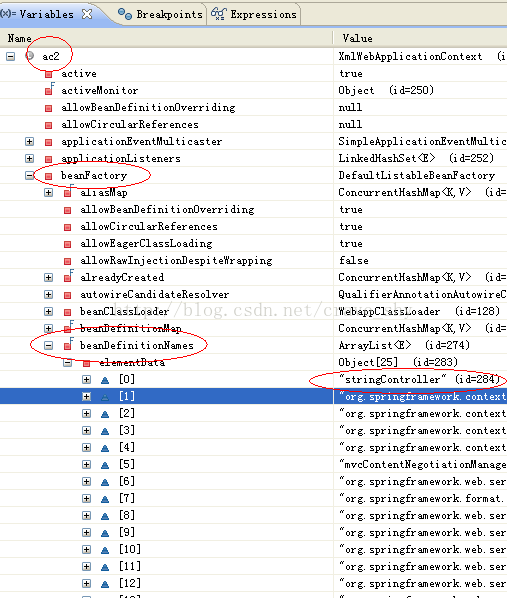
/*** 获取各个上下文、验证springMVC上下文继承与spring上下文* 为避免影响、将上面的private SpringManager springManager 注释掉*/@RequestMapping("/getAndValidateContext")public String getAndValidateContext(HttpServletRequest request){//根环境上下文ServletContext——服务器上下文ServletContext sc = request.getSession().getServletContext();//根据ServletContext获取spring上下文、继承与ServletContextWebApplicationContext ac1 = WebApplicationContextUtils.getWebApplicationContext(sc); //获取springMVC上下文、继承与spring上下文WebApplicationContext ac2 = RequestContextUtils.getWebApplicationContext(request);//验证springMVC上下文继承与spring上下文/** 我们知道通过spring配置文件的bean标签、在服务器启动的时候就已经将 SpringManager为我们注入好了* 所以我们可以通过spring的上下文来获取springManager的实例来调用get()方法、看能不能输出东西就ok*/SpringManager springManager1 = (SpringManager) ac1.getBean("springManager");springManager1.get();System.out.println("===========================================");//通过springMVC获取StringManager实例SpringManager springManager2 = (SpringManager) ac2.getBean("springManager");springManager2.get();/** 有兴趣的可以通过debug5的形式看看ac1、ac2中都有哪些东西、我们可以通过getBean方法获取想要的*/return "success";}代码中ac1、ac2中beanFactory中部分内容(debug形式观察):
ac2中beanFactory中部分内容(debug形式观察):
补充:
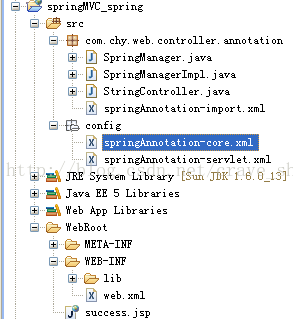
1、整体结构图
2、web.xml
contextConfigLocation classpath*:config/springAnnotation-core.xml org.springframework.web.context.ContextLoaderListener springMVC org.springframework.web.servlet.DispatcherServlet contextConfigLocation classpath*:config/springAnnotation-servlet.xml 1 encodingFilter org.springframework.web.filter.CharacterEncodingFilter encoding UTF-8 forceEncoding true encodingFilter /* springMVC / 3、springAnnotation-servlet.xml与前面一样
4、springAnnotation-core.xml
]>5、springAnnotation-import.xml
]>6、StringController.java
package com.chy.web.controller.annotation;import javax.servlet.ServletContext;
 import javax.servlet.http.HttpServletRequest;import org.springframework.stereotype.Controller;
 import org.springframework.web.bind.annotation.RequestMapping;
 import org.springframework.web.context.WebApplicationContext;
 import org.springframework.web.context.support.WebApplicationContextUtils;
 import org.springframework.web.servlet.support.RequestContextUtils;@Controller
 @RequestMapping("/spring")
 public class StringController {/*//代替struts2中的get、set方法@Resource(name="springManager")private SpringManager springManager;@RequestMapping("/springManager")public String springManager(){System.out.println("this is spring controller");springManager.get();return "success";}*//*** 获取各个上下文、验证springMVC上下文继承与spring上下文* 为避免影响、将上面的private SpringManager springManager 注释掉*/@RequestMapping("/getAndValidateContext")public String getAndValidateContext(HttpServletRequest request){//根环境上下文ServletContext——服务器上下文ServletContext sc = request.getSession().getServletContext();//根据ServletContext获取spring上下文、继承与ServletContextWebApplicationContext ac1 = WebApplicationContextUtils.getWebApplicationContext(sc);	//获取springMVC上下文、继承与spring上下文WebApplicationContext ac2 = RequestContextUtils.getWebApplicationContext(request);//验证springMVC上下文继承与spring上下文/** 我们知道通过spring配置文件的bean标签、在服务器启动的时候就已经将 SpringManager为我们注入好了* 所以我们可以通过spring的上下文来获取springManager的实例来调用get()方法、看能不能输出东西就ok*/SpringManager springManager1 = (SpringManager) ac1.getBean("springManager");springManager1.get();System.out.println("===========================================");//通过springMVC获取StringManager实例SpringManager springManager2 = (SpringManager) ac2.getBean("springManager");springManager2.get();/** 有兴趣的可以通过debug5的形式看看ac1、ac2中都有哪些东西、我们可以通过getBean方法获取想要的*/return "success";}
 }
7、SpringManager.java
package com.chy.web.controller.annotation;public interface SpringManager {public void get();
 }
8、SpringManagerImpl.java
package com.chy.web.controller.annotation;public class SpringManagerImpl implements SpringManager{public void get() {System.out.println("this is get() method");}
 }
更多内容: springMVC系列之目录——00
标签:
相关文章
-
无相关信息