公司中怎么使用beego搭建项目(一)
程序开发
2023-09-07 19:52:31
新建项目
大家在自己的项目目录下使用bee new XXXX命令新建项目
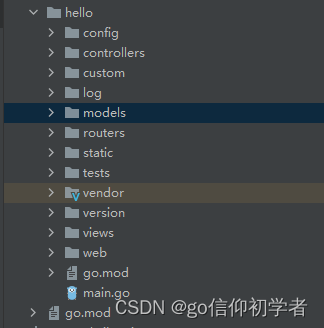
项目格式如图:

我为大家介绍下各个包下是干啥的
main:程序的入口,就是一个房子的大门,
config:配置文件,房子的各个结构的配置
controllers:就是接口类似于我们房子里的各个小房间
custom:一般用来存放配置文件,我建议大家使用ini文件来设置配置文件,比较高效
log:主要是日志功能帮助我们记录程序的问题
models:一般存放的就是与controllers对应的对数据库进行增删改查的操作,说的简单一点,如果您的应用足够简单,那么 Controller 可以处理一切的逻辑,如果您的逻辑里面存在着可以复用的东西,那么就抽取出来变成一个模块。因此 Model 就是逐步抽象的过程,一般我们会在 Model 里面处理一些数据读取,
routers:路由配置,简单的来说就是根据我们从前端接收信息在后后端调用与之对应的路由找到controllers对数据库操作,返回给前段需要的值
static:包含了很多的静态文件,包括图片、JS、CSS
tests:测试用的
vendor:程序所用的包
version:程序版本
views:静态文件模板
gomod:所有包的名称在这里可以看到
项目文件配置
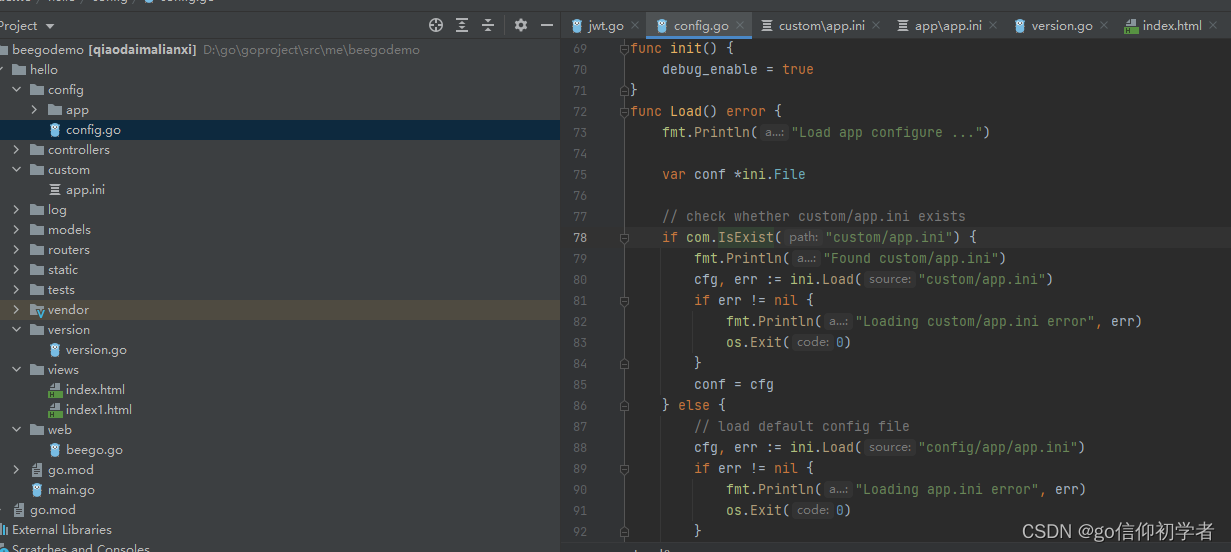
我们在配置文件里面新建config.go

config.go的内容如下:
package config
 import ("fmt""os""github.com/tobyzxj/uuid""github.com/unknwon/com""gopkg.in/ini.v1"
 )type Config struct {AppName       string        `ini:"name"`        // 项目名称UUID          string        `ini:"-"`           // app 每次启动都会创建一个唯一的uuidEnv           string        `ini:"env"`         // development or productionServer        Server        `ini:"server"`      // http server listen portLog           Logs          `ini:"logs"`        // logTimeZone      TimeZone      `ini:"time"`        // time zone infoJWT           JWT           `ini:"jwt"`         // jwtTest          Database      `ini:"test"`        // main db infoRedis         Redis         `ini:"redis"`       // redis}
 //项目的端口号
 type Server struct {Domain string `ini:"domain"`Addr   string `ini:"addr"`Port   string `ini:"port"`
 }// JWT jwt 接口信息配置
 type JWT struct {Issuer         string `ini:"issuer"`Subject        string `ini:"subject"`Audience       string `ini:"audience"`ExpirationTime int    `ini:"expiration_time"`
 }
 //日志
 type Logs struct {MaxLines string `ini:"maxlines"`MaxSize  string `ini:"maxsize"`Daily    bool   `ini:"daily"`MaxDays  string `ini:"maxdays"`Rotate   bool   `ini:"rotate"`Level    string `ini:"level"`
 }
 //时区
 type TimeZone struct {TimeStandard string `ini:"time_standard"`TimeZone     string `ini:"time_zone"`
 }
 //数据库
 type Database struct {Url       string `ini:"url"`Username  string `ini:"username"`Password  string `ini:"password"`TableName string `ini:"tbname"`
 }
 //huancun
 type Redis struct {Host        string `ini:"host"`Db          string `ini:"db"`MaxIdle     int    `ini:"maxidle"`MaxActive   int    `ini:"maxactive"`IdleTimeOut int    `ini:"idletimeout"`Password    string `ini:"password"`Twemproxy   bool   `ini:"twemproxy"`
 }
 var GCfg Config
 var debug_enable boolfunc init() {debug_enable = true
 }
 //配置文件读取
 func Load() error {fmt.Println("Load app configure ...")var conf *ini.File// check whether custom/app.ini existsif com.IsExist("custom/app.ini") {fmt.Println("Found custom/app.ini")cfg, err := ini.Load("custom/app.ini")if err != nil {fmt.Println("Loading custom/app.ini error", err)os.Exit(0)}conf = cfg} else {// load default config filecfg, err := ini.Load("config/app/app.ini")if err != nil {fmt.Println("Loading app.ini error", err)os.Exit(0)}conf = cfg}err := conf.MapTo(&GCfg)if err != nil {fmt.Println("app.ini format error", err)os.Exit(0)}// debugif debug_enable {GCfg.debug()}GCfg.UUID = uuid.New()return nil
 }func Debug(enable bool) {if enable {debug_enable = truereturn}debug_enable = false
 }func (c *Config) debug() {fmt.Println("Name:", c.AppName)fmt.Println("Env:", c.Env)fmt.Println("Test.Url:", c.Test.Url)fmt.Println("Test.Username:", c.Test.Username)fmt.Println("Test.Password:", c.Test.Password)fmt.Println("Test.TableName:", c.Test.TableName)fmt.Println("Redis.IdleTimeOut:", c.Redis.IdleTimeOut)fmt.Println("Redis.MaxActive:", c.Redis.MaxActive)fmt.Println("Redis.MaxIdle:", c.Redis.MaxIdle)fmt.Println("Redis.RedisDb:", c.Redis.Db)fmt.Println("Redis.RedisHost:", c.Redis.Host)fmt.Println("Redis.Password:", c.Redis.Password)fmt.Println("Redis.Twemproxy:", c.Redis.Twemproxy)fmt.Println("JWT.Issuer:", c.JWT.Issuer)fmt.Println("JWT.Subject:", c.JWT.Subject)fmt.Println("JWT.Audience:", c.JWT.Audience)fmt.Println("JWT.ExpirationTime:", c.JWT.ExpirationTime)
 }
我们在cunstom新建一个ini文件
 ; App name
 name = "hello"; App runmode
 ; development or production
 env = development; Http server
 [server]
 domain = test.com
 addr = 127.0.0.1
 port =9999; Log configure
 [logs]
 maxlines = 1000000
 maxsize = 256
 daily = true
 maxdays = 60
 rotate = true
 level = 7
 [jwt]
 issuer = niot.dcgc.com.cn
 subject = niot
 audience = sluan
 expiration_time = 7200
 ; dcgc MySQL DB configure
 # read and wirte
 [test]
 url = 127.0.0.1:3306
 username = root
 password = 123456
 tbname = test; TimeZone configure
 [time]
 # valid values for time standard are:
 #     * UTC - Coordinated Universal Time
 #     * Local - TIme of Server, default config
 time_standard = UTC# valid values for time standard are:
 #     * UTC
 #     * US/Central
 #     * US/Pacific
 #     * Asia/Shanghai
 #     * ...
 time_zone = Asia/Shanghai
 ; Redis configure
 [redis]
 host = 127.0.0.1:6379
 db = 3
 maxidle = 10
 maxactive= 100
 idletimeout = 180
 password =123456
 twemproxy = false
在config里面有个配置文件读取
 main.go文件配置
 func main() {// Load configure// Must Call before log.Init()config.Load()log.Init()// Test for log modulelog.GLog.Info("Starting App --> %s ...", config.GCfg.AppName)// Init databseerr := models.InitDB()if err != nil {log.GLog.Error("Init db failed, err: %s", err)os.Exit(0)}// Init Redismodels.InitRedis(config.GCfg.Redis.Host,config.GCfg.Redis.Db,config.GCfg.Redis.Password,config.GCfg.Redis.MaxIdle,config.GCfg.Redis.MaxActive,config.GCfg.Redis.IdleTimeOut,config.GCfg.Redis.Twemproxy)// Start beegoweb.BeegoRun()
 }
首先读取这个函数对数据库,缓存全都进行初始化,最后启动这个项目
router.go路由配置
package routersimport ("encoding/json""github.com/astaxie/beego/context""hello/config""hello/controllers""hello/controllers/auth""hello/controllers/system""hello/log""hello/models""time""github.com/astaxie/beego"
 )
 // 不需要进行验证的路由表
 var noAuthRouters = map[string]bool{"/v1/manage/user/login": true,
 }// 路由匹配
 func matchRouter(path string, routers map[string]bool) bool {_, ok := routers[path]return ok
 }func init() {nsV1System := beego.NewNamespace("/v1/system",beego.NSRouter("/time", &system.TimeController{}, "get:GetTime"),beego.NSRouter("/version", &system.VersionController{}, "get:GetVersion"),)nsV1Auth := beego.NewNamespace("/v1/auth",beego.NSRouter("/token", &auth.JWTController{}, "get:GetToken;post:PostToken"),)ns:=beego.NewNamespace("v1",beego.NSBefore(apiJwtAuth),beego.NSRouter("/regist",&controllers.BaseController{},"post:PostRegister"),beego.NSRouter("/login",&controllers.BaseController{},"get:PostRegister"),)beego.AddNamespace(nsV1System)beego.AddNamespace(nsV1Auth)beego.AddNamespace(ns)
 }
今天内容先到这里后面我会慢慢更新,喜欢的大家点个赞点个收藏
标签:
上一篇:
AngularJS:与后端服务器通讯
下一篇:
相关文章
-
无相关信息
